How to lock down your facebook account
Facebook definitely allows you to easily communicate with others, but if you’re not careful, certain information you would like to remain private can be exposed. Here we take a look at locking down your profile, and how to avoid other annoyances.
Privatize Your Profile
Facebook is a great way to keep in touch with friends, family and other contacts online. It’s also a great place to spread personal information, pictures, and other data to everyone if you don’t use the proper settings. The first thing you want to do is change default settings under the Privacy Settings.
Take the time to go through each of the privacy sections and make the appropriate choices for your profile.
Go through each section to adjust who can see your information. Of course showing it to everyone will be the least private.
Make sure to go through the settings for both Basic and Contact information.
If you choose a custom setting you can select who sees it and even block out specific users (like your crazy ex).
Control what information is on your wall, and what posts to your friend’s wall.
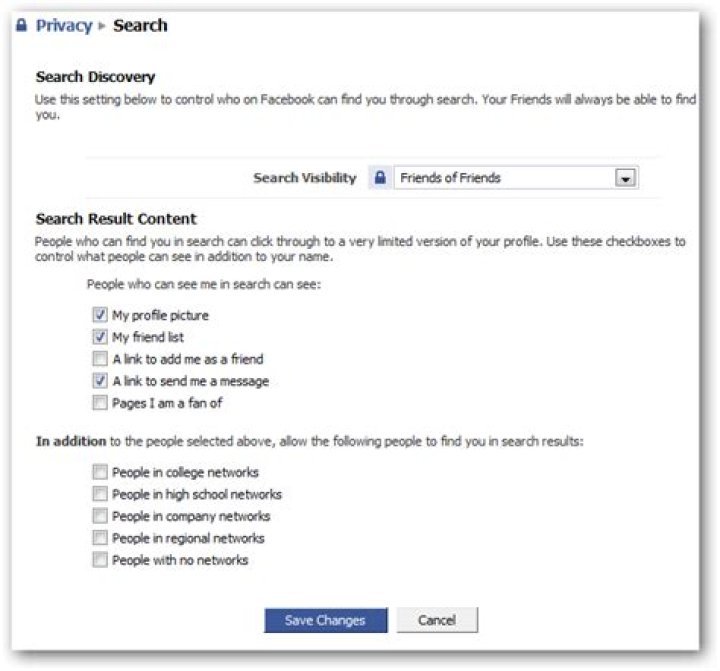
Control what other people can see about you in searches.
If there are certain users you don’t want to be able to contact you then you can put them in the block list.
Avoid Quizzes and Other Snooping Apps
You might be enticed to take the multitude of quizzes and games on Facebook because you’re bored or other friends have recommended them. They can however, be aggressive data miners. So when you’re taking a quiz to find out “Who is your Celebrity Twin” the developers of those quizzes are gathering your personal data.
It’s not a secret that your information is being shared through Facebook applications. If you go into the Applications overview under Privacy settings, it states how apps interact with your data. Here are a few of the items in the privacy statement.
“When you authorize an application, it will be able to access any information associated with your account that it requires to work.”
“When a friend of yours visits an application or authorizes it, the information that the application can access includes your friend’s friend list and information about the people on that list.”
“If you interact with an application that has been restricted to users of a certain age and/or country without explicitly authorizing the application, the application might be able to infer your approximate birth date or location because you were able to access the application.”
Under the Privacy section and Application Settings you can control what types of information can be seen through apps. If you don’t want anything shared select that option at the bottom.
With Facebook being a central hub of social activity, you might have co-workers, supervisors, or the head boss as a contact. If you are playing games on company time, make sure you don’t get busted on Facebook. Under the same apps privacy page we were at above, scroll down a bit further and check the box under Beacon Websites. A Beacon Site where you play a game needs to be an affiliate of Facebook, but if you aren’t sure, you might want to check this box to be safe.
Block Facebook Annoyingness
If you’re sick of seeing messages every time a friend takes a quiz or makes a move in Mafia Wars, make sure and check out The Geek’s article on how to Block Those irritating Facebook Quiz & Application Messages.
Conclusion
Facebook can be a lot of fun and is a great place to keep in touch with others, but by default it shares a lot of information that you might want to remain private. These steps should help you out in protecting your privacy, and avoiding potentially embarrassing or awkward situations.
Best 3 Method To Unlock Facebook Photo Verification. Best Solution / Facebook Photo Verification Software / Problem Solve / Buypass Photo Tag & Government Id Verification
Unlock Facebook Photo Tag Verification – oops many of people facing issues / problem on Facebook for security reasons. maximum people got blocked by Facebook for invalid activity. facebook have some terms & conditions without knowing that many people doing invalid activity continuously so Facebook cannot accept that & eliminate this Facebook account by for 7 Days 30 Days or permanently. So today we will show fb photo verification solution.
Also Read – Facebook Fan Page Autolike Trick
We research on that & know that maximum time Facebook blocked those user who have new in Facebook. old user also (Facebook account age minimum 6 months) blocked some time for miss use Facebook. this time we are very upsetting & try to recover our fb account. but i know 95% user failed to recover it. so in this post we are talking about top 3 way to recover Facebook account easily & it will working 100% tested & verified.
Reason To Blocked Facebook Account :
1. Ad Friend Issues : Many of reason can have for that you eliminate by Facebook. some time new user want to add unlimited friends on Facebook & want to famous very quickly but that is a invalid activity for Facebook so you can Blocked for that
2. Adult Content / Violet : If Upload Any Pornography photo & video on Facebook you will be blocked within 24 hours.
3. Unknown Friends Request Send & Accept : If you continuously accept unknown Friend request or add friends who is not is you school / college / office friends then you will be blocked temporarily or permanently. in this time you can re Activate your account by photo tags Verification
4. Facebook Profile Name Change / Fake Name User – Some time many people use fake name of Facebook & many people try to change fb Profile name so this way you can Blocked
5. Unlimited Tag – Some time many people Upload photo / video / status on Facebook & they tag their all friends for getting like comment but this way Facebook could be blocked & you will get photo tag Verification
7. Facebook Autolike / Comment / Follow / Friend Request : Facebook Autolike is a good platform to showing your popularity. by Facebook Autolike & auto Comment you can give you fb photo verification solution limited like on your phone / status but maximum time.but some time following this method many fb Account blocked
8. Date Of Birth Changes – Many people / girls didn’t know how to take only me date of birth from Facebook profile & they try to change fb DOB & got block this way.
9. Add All Friends On Facebook Groups & Page Invite All Extraction : Some software & extraction Available that support all invitation / add on ground. but using this extension your Facebook account can be blocked for Photo tag Verification
10. Wrong Password Enter : If you forget your fb password then recover password by forgot option. but is you try to entering login on Facebook using multiple different password then you will be got tag Verification
1st Method : To Unlock Fb Account From Photo Verification :
1. Firstly Open Facebook Account Windows Using PC / Laptop
2. Install Hola (Ip & country Change) Extraction
3. Select Japan Contrary & Connect It
4. Now Ligin On Facebook From –
5. Now Here You Will See A Captcha Code Fill That & Submit
6. Then Click On Start
7. Now Confrom Your Date Of Birth
8. Create A New Password & Conform It
9. Finally Login On Fb Account Using New Password. Enjoy
How To Protect Your Account From Facebook Photo Tag Verification :
2Nd Method : To Unlock Facebook Account From Facebook Photo Tag Verification :
This a screen shot method.this method for ph & pc user.
1. Login Your Facebook Photo Verification Page & Take Screenshots With Name
2. Skip & Take screenShort Or Selected Any Name & Take screenshots
3. On Next Day You Will Get Same photos With Different Name Check Wich Name March With Past Day’s Scree Shot
4. You Will Get Total 6 Photos & You Have To Correct Answers Minimum 4 Photos
4. This Way you Can Get back Your Facebook account
3rd Method : Contact With Us & Get Help :
If you cannot Successful to return your fb account then we will always ready to help you. just contact us on our WhatsApp & Send Your Issues There We Will Reply & Try to Solve Your Issue As soon As Possible
How To Protect Facebook Account From Photo Tag Verification :
On above stage we are discuss about how can block you fb Account. read out top 10 reason for block fb Account & try to follow & remember Those steps. don’t try to doing any invalid activity on Facebook. Some Points & Safety Tips Following That You Can Never Get Photo Tag Verification Or blocked
1. Don’t Send Unlimited Friends Request
2. Don’t Send Friend Request To Unknown Friends
3. Don’t Accept Any Unknown Friends Request
4. Don’t Upload Any Invalid / Adult Containt
5. Use Your Original Name On Facebook Account That Have On Your Aadhaar Card / Id Card
6. Don’t Try To Use Any Fake Account / Fake Name Account
7. You Can Send Daily 3 Friends Request & Who Didn’t Account Your Friend Request Then Cancel That After 24 Hours
8. Don’t Change Gender, Date of Birth, Facebook User Name
Share:
- Click to share on Twitter (Opens in new window)
- Click to share on Facebook (Opens in new window)
- Click to share on Pinterest (Opens in new window)
Privacy concerns are on the minds of everyone, and with good reason. With all of the various websites, software programs and applications collecting our data, it’s enough to make anyone nervous. And Facebook is one of the biggest culprits. Not simply because of its tracking methods, but also because it’s so popular.
Nearly everyone uses Facebook to keep in touch with family, friends and colleagues. But, if you’re a Komando.com follower, then you know all about the ways Facebook can track you. Methods such as household targeting are why Facebook is so attractive to advertisers. Plus, if you’re not careful, your profile information can fall into the wrong hands.
That’s why it’s so important that you lock down your Facebook account for maximum privacy and security. And the good news is, it’s not that hard. We’ll walk you through the steps.
For your Facebook profile’s Security Settings, here’s what they do.
Choose friends to contact if you get locked out – If for some reason you don’t have access to your phone, email, nor do you have your security codes, you can nominate three to five of your closest Facebook friends to generate security codes for you. You have to think twice about using this, obviously, because of security purposes. We feel that the proper use of two-factor authentication and the login codes should be enough.
Tech news that matters to you, daily
Privacy, security, the latest trends and the info you need to live your best digital life.
Where You’re Logged in – Now this could save you in a pinch. This is a list of all your currently active Facebook sessions. This specifies the type of browser or app that’s logged in to your account and the session may be on any one of your devices. Review this list regularly and if you see a session you are not familiar with, you could log it out and close it clicking the three dots on the right side then choose “Log Out.”
Change password – This is self-explanatory. Use this to create a new password if you think your account was compromised or if you need a stronger one.
Log in with your profile picture – On your recognized and approved devices, use this to save time. This allows you to tap on your profile picture to log in to your account instead of entering your password each time.
Get alerts about unrecognized logins – We recommend that you turn on Notifications. That way, you will be alerted if a new device tries to log in to your account and approve or reject unknown logins.
Use two-factor authentication – If you are logging in from a previously unused device or browser, a text message with a verification code will be sent to your phone. This code then is used, in conjunction with your email and password, to log in. This adds an extra layer of security that is common with numerous web services so we recommend that you utilize it.
Within this section, you can review a bunch of options
- Text message (SMS) – this is where you enter the phone number you want your login code to be sent to.
- Security Keys – This is for authorizing hardware USB or NFC keys.
- Code Generator -Apart from the text message authentication, if you want to generate your own login codes, you could use third party authenticator mobile apps like 2STP Authenticator or the aptly named app, Authenticator to provide those for you. This is totally optional so it is up to you.
- Login Approval Codes/Code Generator – If you turned on Login Approvals, Facebook will generate 10 random codes for you to use in case you lost your phone and you need to log in using another device. Facebook recommends writing them down and keeping them handy, just in case. You could also get new codes in this section.
- App passwords – since two-factor authenticator doesn’t work with all apps (ex. Skype, Spotify), you can use this to generate random passwords for them. If you don’t want to input your Facebook password to log in to other apps that use Facebook accounts, you can also generate your own passwords in this section. Just type the name of the app then click “Generate Password.” You could remove these passwords anytime.
Choose 3 to 5 friends to contact if you get locked out – this is the same thing as “Choose friends to contact if you get locked out.”
Encrypted notification emails – For advanced users who want added email communication security, Facebook added an option to encrypt outbound emails (Facebook to other accounts) with OpenPGP keys. Facebook provides their own public keys you could use.
Bonus: These two security settings were moved to the General section.
Legacy Contact – This is a bit of a downer, but in the event of your death you could choose to memorialize your account and have a Facebook contact look after it. Your legacy contact could then write a pinned post to your Timeline, respond to friend requests and update your profile picture and cover photo. If you want your account to be automatically deleted in the event of your death, you could “Request account deletion” in this section instead.
Deactivate Your Account – the last security setting available to you is for deactivating your account. This will temporarily disable your Facebook profile and will hide almost all of your activity on Facebook. Deactivation will not delete your Facebook account and you could always reactivate it with all your Facebook data still intact.
Facebook deserves a lot of the flack it gets, be it for providing Russian propaganda with a platform or gradually eroding privacy norms. Still, it has some genuine usefulness. And while the single best way to keep your privacy safe on Facebook is to delete your account, taking these simple steps in the settings is the next best thing.
Remember, it’s not just friends of friends you need to think about hiding from; it’s an army of advertisers looking to target you not just on Facebook itself, but around the web, using Facebook’s ad platform. In the video above and the post below, we’ll show you how to deal with both.
Fine-Tuning Friends
Limiting who can see which of your posts is an easy first step. On a desktop, go to the little dropdown arrow in the upper-right corner, and click Settings. From there, click on Privacy on the left-hand side. This is where the magic happens.
Under Who can see my stuff, click on Who can see your future posts to manage your defaults. You can make public to anyone at all, limited to your friends, or exclude specific friends. You can quarantine your posts by geography, or by current or previous employers or schools, or by groups. Just remember that the next time you change it, the new group becomes the default. So double check every time you post.
This section has other important privacy tools you can fiddle with, including who can look you up with your email address or phone number. We’d recommend not listing either in the first place, but if you do, keep the circle as small as possible. (If you do have to share one or the other with Facebook for account purposes, you can hide them by going to your profile page, clicking Contact and Basic Info, then Edit when you mouse over the email field. From there, click on the downward arrow with two silhouettes to customize who can see it, including no one but you.)
But pay special attention to the option to (deep breath) Limit the audience for posts you’ve shared with friends of friends or public? If you ever had a public account, taking it private wasn’t retroactive. If you want to hide those previously viewable posts, lock this setting down.
Over on Timeline and Tagging you can control over what shows up on your own Facebook timeline. Basically, you can’t stop your friends from tagging you (sorry!), but you can stop those embarrassing photos from popping up on your page. At the very least, you should go to Review posts you’re tagged in before the post appears on your timeline, and enable that so that you can screen any tags before they land on your page.
To test out your changes, go to Review what other people see on your timeline. You can even see how specific people view your page, like your boss or your ex or complete strangers. It also never hurts to take stock of you present yourself to the world. (Looking at you, people who haven’t updated your cover photo since the Obama administration.)
That should about cover your friends. Now onto advertisers, which are like friends, except they never leave you alone, even if you ask nicely.
Ad It Up
In that same Settings panel, head down to Ads. As you probably realized, Facebook knows what you do pretty much everywhere online. So does Google, so do dozens of ad networks you’ve never heard of. You’re being tracked pretty much all the time, by everyone, thanks to this here internet.
You can still limit how Facebook uses that information, though. Tired of that lawnmower you looked at following you to Facebook? Turn off Ads based on my use of websites and apps. Saying no to Ads on apps and websites off the Facebook companies does the same, except for all the sites Facebook serves ads to around the web. Which is most of them.
Lastly, for some fun insight into how advertisers think of you, click on Your Interests. There you’ll find all the categories Facebook uses to tailor ads for you. You can remove any you don’t like, and marvel at the ones that don’t make any sense. This won’t make the ads go away, but it’ll at least you can banish all those off-brand kitchen gadgets from your News Feed.
And you’re good! Or at least, as good as can be expected. It’s still Facebook, after all.
Facebook has been dominating the news headlines lately, and not for good reasons. There were the 50 million Facebook user profiles gathered for Cambridge Analytica and used in the 2016 presidential election. Facebook has also long been scraping call and text message data from Android phones. And within Facebook’s iOS app, the company pushes the Onavo Protect VPN, which is an app made by a subsidiary that literally collects all your mobile data traffic for Facebook.
Due to this, many people have encouraged Facebook users to delete their accounts. That even includes the billionaire co-founder of the WhatsApp messaging service, which Facebook bought back in 2014. If you are simply done with Facebook, you’re welcome to deactivate or even delete your account. Facebook provides instructions for both of those actions. Deactivating your account basically just makes you invisible on Facebook, whereas deleting your account may eventually (it can take up to 3 months) result in most of the data being removed.
The problem is that Facebook is quite useful. It may be the only connection you have with certain members of your family or friends, and many informal groups use Facebook as a platform for meetup logistics. For many of us, losing access to Facebook would hurt our real-world activities and relationships. Plus, many companies have Facebook pages, and taking those down might result in a loss of business from customers who would normally find out about the firm only through Facebook. So what to do?
If you’re a business, the most sensible thing is to keep your Facebook page alive, but avoid relying on it entirely. Remember, Facebook is not your friend. Earlier in 2018, Facebook announced that it would be prioritizing posts from your friends and family over public content, which is a nice way of saying that Facebook is deprecating business-related posts. So make sure you have a Web site that you control, and make sure that customers can easily find it and contact you through it. Having a dedicated website for your business is much easier to do now than ever before, and it is important to set yourself apart from other businesses. It is also a good idea to have multiple ways for your customers to contact you, including email and other social platforms. In other words, don’t put all your business eggs in the Facebook basket.
At a personal level, there are two ways to think about privacy on Facebook: limiting the information you share with other people on Facebook, and limiting the information that you’re willing to provide to Facebook at all. If Facebook doesn’t have certain data about you, then quite simply, they can not sell it to the highest bidder, let it be collected by bad guys, or use it in ways you might not want.
To control who on Facebook can see what you share, click the “?” button on the Facebook Web site on your Mac, or tap the hamburger button in the bottom right corner of the Facebook iOS app and tap Privacy Shortcuts. Then click or tap Privacy Checkup and run through the steps to make sure you’re sharing only the infomation you want with the people you choose. Be sure to lock down or remove any connected apps that you don’t need, since they can leak all sorts of data.
Also, go to Facebook’s Privacy Settings & Tools page. Click the Edit button next to each item, and make sure it is as specific as possible. You also might want to review the posts you’re tagged in and remove any that you don’t want on your timeline.
But what about if you don’t want to give information to Facebook for it to use at all? Go to Facebook’s page for Uploading and Managing Your Contacts, and delete them all. You’re just giving away your contacts’ personal information without their permission otherwise. You can always add it back if you choose, but out of respect for others personal information, you should probably think that over first. If you don’t want your information there, don’t share someone else’s.
To ensure that contact uploading doesn’t happen again, in the Facebook iOS app, tap the hamburger button, scroll to the bottom, and then tap Settings & Privacy > Account Settings > General > Upload Contacts and make sure the switch is off. (Some versions of the Facebook app just have Settings, not Settings & Privacy, and show a popover for Account Settings.)
Also, in the iPhone Facebook app, tap the hamburger button again and then Settings & Privacy > Account Settings > Location > Location, and make sure it’s set to Never. And whatever you do, keep Location History off—Facebook doesn’t need to know everywhere you’ve ever been (unless you want them to).
If you’re annoyed by the way Facebook’s iOS app is trying to capture your contacts and locations, you could delete it from your iOS devices and rely instead on the Facebook Web site, (using Safari as your web browser) which isn’t able to access nearly as much information about you. To make it easier to open, in Safari, visit facebook.com, tap the Share button, and then tap the Add to Home Screen button in the bottom row of the share sheet.
Let us leave you with one thought. Always assume that anything you post to Facebook or allow Facebook to have access to could end up on the front page of your local newspaper… or the New York Times. Nothing on Facebook is ever completely private—Facebook is showning it isn’t trustworthy or reliable—and the best way to ensure confidential information doesn’t leak inadvertently is to avoid posting it to Facebook in the first place.
Facebook’s logo is seen through a magnifier in front of a displayed PC motherboard, in this illustration taken April 11, 2016. (REUTERS/Dado Ruvic/Illustration)
You probably spend more time than you care to admit on Facebook, but I’ll bet you spend hardly any of it nosing around Facebook’s settings. In there, you’ll find five very important settings that give you extra layers of security.
1. Use Login Alerts
If someone uses your Facebook ID and password to log in to your account without your permission, wouldn’t you like to know? When Login Alerts is turned on, you will be immediately notified if someone tries to log in to your account from a new place.
To turn on these alerts, log in to Facebook and open your Settings menu. Click on Security, Login Alerts, and Edit. Select Get notifications and Email login alerts, then save your changes.
Should you ever receive an alert from Facebook that someone has logged in to your account from an unrecognized location, it’s critical that you follow the instructions provided. The email will outline steps you should take to reset your password and secure your information.
But one thing you don’t want is to get an alert each time you log in through a device you use regularly. Luckily, you can create a list of trusted devices.
The first time you log in from a new location, on a new browser or with a new device, you’ll be asked if you want Facebook to remember it. Click Save Browser and Facebook won’t notify you of logins from that particular location, browser or device again. Be sure to never do this on a public or work computer.
2. Request Login Approvals
Facebook also tracks how you log in to your account. With a few steps, Facebook will monitor if someone is accessing your Facebook account from a previously unused device or browser. When this happens, a separate verification code will be needed to complete the login process.
To set up these approvals, select Login Approvals in Facebook’s Security Settings, then click the box that says, “Require a security code to access my account from unknown browsers.” Follow the prompts to receive a security code, and re-enter your password.
Once you’ve confirmed that you’re making this request, a box will pop up that says: “Whenever a login is attempted from an unknown browser, we’ll now ask for a security code. For the first week, in case you don’t have your phone, you can turn off Login Approvals without a security code.”
Click, “No thanks, require a code right away.”
3. Keep extra codes on hand
If you turned on Login Approvals, you’ll be asked to enter a security code whenever you log in from a new location. This code can be sent via text or retrieved from the Code Generator section of your Facebook app settings menu.
But if you don’t have access to your phone or tablet, you’ll still need a code to log in to your account. For this reason, Facebook will generate 10 random codes you can use.
Get these backup codes by clicking on Login Approvals within your Facebook Security Settings. Check the link that says, “Get codes to use when you don’t have your phone.”
A list of 10 codes will appear. Print them out and keep them secure.
4. See where you’re logged in and log out remotely
This could certainly save you in a pinch. If you’ve accessed your Facebook account on another computer or device and forgotten to log out, anyone could gain access to your private information. Sometimes you may not even remember that it happened, so it’s important that you review this list regularly.
From your browser, in your Facebook Security Settings, you will see, “Where you’re logged in.” Click that link for a complete list of your current logins as well as a button to log out remotely from each.
These steps are not as straightforward when using the Facebook App. To help you out, click here for a video tutorial as well as step-by-step instructions.
5. Add trusted and legacy contacts
If for some reason you don’t have access to your phone or email, and you don’t have your security codes, you could have one of your closest Facebook friends generate login codes for you. If there’s someone you truly trust, this is a good backup.
Legacy contacts are different. Although this is a downer to think about, in the event of your death you may want someone to look after your Facebook account. With the right permissions, your legacy contact could write a pinned post to your Timeline, respond to friend requests and update your profile picture and cover photo. You can even request that your account be automatically deleted.
You can make these adjustments in the Security Settings, under Trusted Contacts and Legacy Contacts.
Be extremely careful with these settings. For example, you don’t want any of your trusted or legacy contacts to end up on your list of exes.
Visit Komando.com for even more ideas to securing your Facebook profile. Or, to make Facebook work better for you, click here for five hidden Facebook tricks you need to start using.
Share:
- Click to share on Twitter (Opens in new window)
- Click to share on Facebook (Opens in new window)
- Click to share on Pinterest (Opens in new window)
Privacy concerns are on the minds of everyone, and with good reason. With all of the various websites, software programs and applications collecting our data, it’s enough to make anyone nervous. And Facebook is one of the biggest culprits. Not simply because of its tracking methods, but also because it’s so popular.
Nearly everyone uses Facebook to keep in touch with family, friends and colleagues. But, if you’re a Komando.com follower, then you know all about the ways Facebook can track you. Methods such as household targeting are why Facebook is so attractive to advertisers. Plus, if you’re not careful, your profile information can fall into the wrong hands.
That’s why it’s so important that you lock down your Facebook account for maximum privacy and security. And the good news is, it’s not that hard. We’ll walk you through the steps.
For your Facebook profile’s Security Settings, here’s what they do.
Choose friends to contact if you get locked out – If for some reason you don’t have access to your phone, email, nor do you have your security codes, you can nominate three to five of your closest Facebook friends to generate security codes for you. You have to think twice about using this, obviously, because of security purposes. We feel that the proper use of two-factor authentication and the login codes should be enough.
Tech news that matters to you, daily
Privacy, security, the latest trends and the info you need to live your best digital life.
Where You’re Logged in – Now this could save you in a pinch. This is a list of all your currently active Facebook sessions. This specifies the type of browser or app that’s logged in to your account and the session may be on any one of your devices. Review this list regularly and if you see a session you are not familiar with, you could log it out and close it clicking the three dots on the right side then choose “Log Out.”
Change password – This is self-explanatory. Use this to create a new password if you think your account was compromised or if you need a stronger one.
Log in with your profile picture – On your recognized and approved devices, use this to save time. This allows you to tap on your profile picture to log in to your account instead of entering your password each time.
Get alerts about unrecognized logins – We recommend that you turn on Notifications. That way, you will be alerted if a new device tries to log in to your account and approve or reject unknown logins.
Use two-factor authentication – If you are logging in from a previously unused device or browser, a text message with a verification code will be sent to your phone. This code then is used, in conjunction with your email and password, to log in. This adds an extra layer of security that is common with numerous web services so we recommend that you utilize it.
Within this section, you can review a bunch of options
- Text message (SMS) – this is where you enter the phone number you want your login code to be sent to.
- Security Keys – This is for authorizing hardware USB or NFC keys.
- Code Generator -Apart from the text message authentication, if you want to generate your own login codes, you could use third party authenticator mobile apps like 2STP Authenticator or the aptly named app, Authenticator to provide those for you. This is totally optional so it is up to you.
- Login Approval Codes/Code Generator – If you turned on Login Approvals, Facebook will generate 10 random codes for you to use in case you lost your phone and you need to log in using another device. Facebook recommends writing them down and keeping them handy, just in case. You could also get new codes in this section.
- App passwords – since two-factor authenticator doesn’t work with all apps (ex. Skype, Spotify), you can use this to generate random passwords for them. If you don’t want to input your Facebook password to log in to other apps that use Facebook accounts, you can also generate your own passwords in this section. Just type the name of the app then click “Generate Password.” You could remove these passwords anytime.
Choose 3 to 5 friends to contact if you get locked out – this is the same thing as “Choose friends to contact if you get locked out.”
Encrypted notification emails – For advanced users who want added email communication security, Facebook added an option to encrypt outbound emails (Facebook to other accounts) with OpenPGP keys. Facebook provides their own public keys you could use.
Bonus: These two security settings were moved to the General section.
Legacy Contact – This is a bit of a downer, but in the event of your death you could choose to memorialize your account and have a Facebook contact look after it. Your legacy contact could then write a pinned post to your Timeline, respond to friend requests and update your profile picture and cover photo. If you want your account to be automatically deleted in the event of your death, you could “Request account deletion” in this section instead.
Deactivate Your Account – the last security setting available to you is for deactivating your account. This will temporarily disable your Facebook profile and will hide almost all of your activity on Facebook. Deactivation will not delete your Facebook account and you could always reactivate it with all your Facebook data still intact.
The only way to be truly secure on Facebook is to delete your account. But that’s crazy talk! Here’s how to lock down your privacy and security and bonus, keep targeted ads at bay.
Released on 11/14/2017
I’ll be honest with you,
the best way to keep your privacy intact on Facebook
is to delete your account.
But that’s crazy talk.
Without Facebook you’d never find out
which of your high school friends went on to embrace
fringe political views,
or see sponsored ads for clothing companies
you’ve never heard of.
Instead, here are a few simple steps you can take
to make sure you’re sharing what you want
with who you want, including advertisers.
Alright, let’s start with the easy part:
limiting who can see which of your posts.
If you’re on a desktop,
and it’s probably easier to do there,
go to the little dropdown arrow
in the upper right-hand corner and click settings.
From there, click on privacy’ on the left-hand side.
And get comfy, because you’re gonna spend
a little time here.
Under who can see my stuff,
the who can see your future posts’ option
lets you manage your defaults,
that means you can set it to whoever you want.
Public means anyone at all,
you can limit it to your friends,
you can limit it to all your friends except
for Jerry and Pam, because screw those guys.
You can quarantine your posts by geography,
or by current or previous employers or schools or groups.
It’s very granular.
Just remember that the next time you change those settings,
that group becomes your default for every post from then on.
So, double-check every time you go ahead
and send something out there.
This section has other important privacy tools
you can fiddle with, including who can look you up
with your email address, your phone number.
Just to be safe, go ahead and say no one.
But pay special attention to the option to
limit the audience for posts you shared
with friends of friends, or public.
I know that’s a mouthful, but basically what it means
is if you used to have a public account,
but then thought better of it, great.
Good move, smart.
But you also need to lock this setting down to make sure
that those old public posts become private now.
That doesn’t happen retroactively.
Once you’ve taken care of that,
head over to Timeline and Tagging.
This gives you some control over what shows up
in your Facebook timeline.
Basically, you can’t stop your friends from tagging you,
and they’re going to because friends are terrible,
but you can stop those embarrassing photos
from popping up on your page.
At the very least, you should go to Review posts
you’re tagged in before the post appears on your timeline.
To test out your changes,
go to review what other people see on your timeline.
You can even see how specific people view your page,
like say your ex, not that you’re hung up on them
or anything at all, of course.
That should just about cover your friends.
Now on to advertisers, which are like friends,
except they never leave you alone even if you ask nicely.
In that same settings panel, head down to Ads.
Now, as you’ve probably already guessed,
Facebook knows what you do pretty much everywhere online.
So does Google, so do dozens of
ad networks you’ve never heard of.
You can still limit how Facebook
uses that information though.
If you go ahead and turn off,
ads based on my use of websites and apps,
that lawnmower you looked at on Amazon
won’t follow you over to Facebook.
Say no to, ads on apps and websites
off the Facebook Companies.
It does the same, except for all the sites
Facebook serves ads to around the web.
Lastly, for some fun insight into how advertisers
really think of you, click on your interests.
There you’ll find all the categories Facebook uses
to tailor ads for you.
You can remove any you don’t like,
and marvel at the ones that don’t make any sense.
Facebook deserves a lot of the flack it gets, be it for providing Russian propaganda with a platform or gradually eroding privacy norms. Still, it has some genuine usefulness. And while the single best way to keep your privacy safe on Facebook is to delete your account, taking these simple steps in the settings is the next best thing.
Remember, it’s not just friends of friends you need to think about hiding from; it’s an army of advertisers looking to target you not just on Facebook itself, but around the web, using Facebook’s ad platform. In the video above and the post below, we’ll show you how to deal with both.
Fine-Tuning Friends
Limiting who can see which of your posts is an easy first step. On a desktop, go to the little dropdown arrow in the upper-right corner, and click Settings. From there, click on Privacy on the left-hand side. This is where the magic happens.
Under Who can see my stuff, click on Who can see your future posts to manage your defaults. You can make public to anyone at all, limited to your friends, or exclude specific friends. You can quarantine your posts by geography, or by current or previous employers or schools, or by groups. Just remember that the next time you change it, the new group becomes the default. So double check every time you post.
This section has other important privacy tools you can fiddle with, including who can look you up with your email address or phone number. We’d recommend not listing either in the first place, but if you do, keep the circle as small as possible. (If you do have to share one or the other with Facebook for account purposes, you can hide them by going to your profile page, clicking Contact and Basic Info, then Edit when you mouse over the email field. From there, click on the downward arrow with two silhouettes to customize who can see it, including no one but you.)
But pay special attention to the option to (deep breath) Limit the audience for posts you’ve shared with friends of friends or public? If you ever had a public account, taking it private wasn’t retroactive. If you want to hide those previously viewable posts, lock this setting down.
Over on Timeline and Tagging you can control over what shows up on your own Facebook timeline. Basically, you can’t stop your friends from tagging you (sorry!), but you can stop those embarrassing photos from popping up on your page. At the very least, you should go to Review posts you’re tagged in before the post appears on your timeline, and enable that so that you can screen any tags before they land on your page.
To test out your changes, go to Review what other people see on your timeline. You can even see how specific people view your page, like your boss or your ex or complete strangers. It also never hurts to take stock of you present yourself to the world. (Looking at you, people who haven’t updated your cover photo since the Obama administration.)
That should about cover your friends. Now onto advertisers, which are like friends, except they never leave you alone, even if you ask nicely.
Ad It Up
In that same Settings panel, head down to Ads. As you probably realized, Facebook knows what you do pretty much everywhere online. So does Google, so do dozens of ad networks you’ve never heard of. You’re being tracked pretty much all the time, by everyone, thanks to this here internet.
You can still limit how Facebook uses that information, though. Tired of that lawnmower you looked at following you to Facebook? Turn off Ads based on my use of websites and apps. Saying no to Ads on apps and websites off the Facebook companies does the same, except for all the sites Facebook serves ads to around the web. Which is most of them.
Lastly, for some fun insight into how advertisers think of you, click on Your Interests. There you’ll find all the categories Facebook uses to tailor ads for you. You can remove any you don’t like, and marvel at the ones that don’t make any sense. This won’t make the ads go away, but it’ll at least you can banish all those off-brand kitchen gadgets from your News Feed.
And you’re good! Or at least, as good as can be expected. It’s still Facebook, after all.




