How to decoupage flower pots
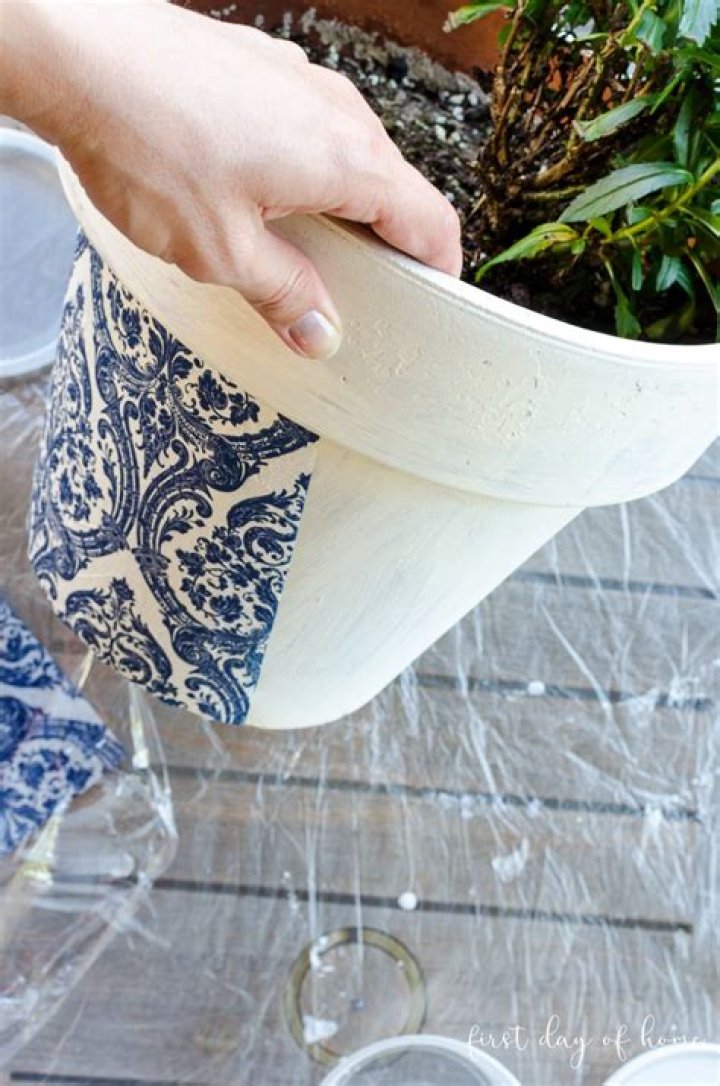
Once you learn how to decoupage flower pots with napkins, you’ll never look at a pot the same way! In my last post, I shared tips on painting terracotta pots like a pro. In Part 2, we’ll use Mod Podge to create a chinoiserie look for your container garden.
Big thank you to PLAID for providing the supplies used in this post! This post contains affiliate links, and I will be compensated if you make a purchase using my links, at no extra cost to you. For more information, please see my disclosures.
How to Use Mod Podge on Flower Pots
Before you begin, it’s important to get the right Mod Podge for the job. You can view all the details in my related YouTube video.
Over the years, I’ve used decoupage to upcycle old picture frames, decorate wooden spoons, and make DIY wood signs. Each project was a bit unique and required slightly different techniques.
Upcycled magnetic picture frame
Decoupage wooden spoons
Decoupage wood sign
The most important aspect of decoupaging outdoor flower pots is knowing how to seal the terracotta. I used Mod Podge Outdoor specifically for this purpose.
I first used this product when creating my patriotic garden stakes, and I loved the results back then! “Why not give it another go?” I thought. Well, I’m glad I did because I think this is one of my favorite projects ever!
The active time involved is minimal, though you should plan to wait about 20-30 minutes between coats and 3-7 days before placing your pots outdoors.
I know, it’s hard to wait to display something so pretty! I promise it’s worth the wait!
Tips for Making Decoupage Flower Pots
You can scroll down for the complete tutorial, but be sure to check out these tips before you get started on your project.
Tip #1: Seal the inside of the flower pots
As I mentioned in my post on painting terracotta pots, to get the best results, you should seal the inside of your flower pots before painting them.
I like to use this clay pot sealer to do the job because it sprays on so easily.
Tip #2: Always paint the terracotta pots first
When using napkins for decoupage, you’ll want to apply a light-colored basecoat of paint first. This helps to make your napkin design stand out and get all the attention it deserves.
If you’ve sealed the pots already (which I hope you did), you can use chalk paint or, better yet, outdoor acrylic paint for this purpose. I like the matte finish of chalk paint, but it’s totally your choice. Spray paint is another perfectly good option.
Tip #3: Use plastic wrap to prevent tearing
If you ask me, plastic food wrap is key when decoupaging with thin tissue paper or napkins. Gently lay the plastic over the napkin once you apply it to the pot, and you won’t have trouble with sticky fingers. As you’ll see in my upcoming video, it also helps prevent the paper from tearing.
Also, you can let the Mod Podge dry slightly before applying the napkin to ensure that the paper won’t become too saturated.
Tip #4: Remove napkin edges with a paintbrush and water
Over the years, I’ve discovered that using a wet paintbrush helps to remove edges of your napkin for decoupage.
When using napkins for decoupage, you have the choice to 1) apply the whole napkin or 2) cut out smaller portions to partially cover the pots.
I chose the first option, so I dipped a paintbrush in water to tear off any excess pieces of napkin around the rim and bottom. This gives you nice, soft edges that make the design look hand-painted.
Tip #5: Never expose a decoupage flower pot to direct rain or sunlight
Mod Podge Outdoor works really well for a covered porch or patio, but you’ll want to avoid exposing your finished pots to rain or sun. This decoupage glue is water-resistant, not waterproof.
If you start to see some wear and tear on your pots after some time, you can always re-apply a coat of Mod Podge Outdoor.
I am adding bright spring colors to my home decor, hoping that will bring Spring here sooner. I am so ready to put away my winter clothes, and I am SO ready to wear my light blazers and flats.
Today I will show you a quick tutorial of how you can make these lovely decoupaged terra cotta pots.
We went to Florida in February, and we stop to pick oranges on a fun orange farm. The boys and we enjoyed picking oranges and playing around on the farm. The oranges that we ate there were phenomenal. They seriously had the best oranges, ever! We loved them so much that we took some oranges home, and hub decided to plant those seeds so we can grow those yummy oranges.
Yeah…I can’t wait to see those oranges:-) I am not very optimistic that we will ever see oranges here.:-)
So there were plenty of seeds and my hub germinated them, and once the seeds were split he put them in these plain terra-cotta pots, he marked each pot and put them out to the window. I couldn’t stand anymore how ugly they looked. I decided to pretty those pots.
I had some beautiful decorative napkins that my sweet friend left for me when she moved back to Hungary, and I decided to use to some of those pretty napkins to decoupage these plain terra cotta pots.
Materials needed for the project:
– lovely decorative napkins ( possibly with patterns or shapes that you can cut out )
– paint ( acrylic paint would totally work)
It was so super easy to do, and I love my “new” pots.
1. First I painted my pots. I used Martha Stewart chalk paint for the yellow and regular acrylic paint for the white paint.
2. I let the paint completely dry.
3.While the paint was drying, I cut out my flowers shape from the napkin.
4. I mod podge the napkin and slowly smoothed it on the pot.
5. I then sealed the whole pot with a coat of mod podge.
Yep. Simple is that my friends!
My pots look fabulous now.
A 15-minute quick craft can go a long way.
So what are you waiting for my friends?
Find some gorgeous napkins and get decoupaging! So easy and the I bet for anything that you will love the result.
Now I am only waiting for my yummy oranges to grow:-)
Thanks for stopping by today!
*** This project was featured on a Housewarming party***
Why Decoupage Clay Pots?
Why use decoupage clay pots? Well, decoupage is a relatively easy way to add an amazing vibrant effect to your pots.
Its versatility allows you to add a vast array of color and intricate detail without needing to be amazing at art, or really have any ability in the area of fine art.
Don’t get me wrong, I’m not suggesting that there is no skill involved. But a beginner can easily produce a decent completed project in a very short time. Where more experienced hands could produce a much more intricate design and be more adept at creating depth and using a variety of materials to produce their finished work.
In short, Decoupage is an easy craft to get into, with a massive opportunity to gain more detailed skills over time.
What is Decoupage?
Decoupage in its simplest explanation is a technique of decorating surfaces with cut out images which are sealed in layers of varnish.
Most often the images are cut or torn from paper, but can also be cut from card or materials.
Tools and Materials
Decoupage is a vast and growing hobby and a such you will find that you can search for and find a vast array of tools, sealants, varnishes and images specifically being marketed for the subject.
To be honest, though, you really don’t need to buy specifically produced items. Decoupage clay pots projects can be as low cost as using items you already have.
All you really need to begin are:
- A clay/terracotta pot – an old one from the garden will do for a beginning. Even a broken one can create a lovely project.
- Sealant – You will need to seal your pot before you begin. Any sealant suitable for the surface you are working on. So for clay pots, you will need a sealant for clay pots, concrete or other porous, outdoor surface.
- Images – any pictures you would like to add to your decoupage clay pots project. These can be a paper printout, a pretty napkin, a piece of fabric. Virtually anything that is flexible enough to be able to glue to your surface.
- Glue – this could be as simple as PVA as you will be sealing/varnishing the project afterwards.
- Varnish/Sealant – Can be high gloss, matt or silk finish. Or you can use coats of wax or other decorative finishes as long as it seals it tight.
- You may need brushes, sponges or cling film for help with applying the images and varnishes etc.
How To Decoupage Clay Pots
Clean Your Pots
Before you begin to decoupage clay pots, you need to ensure that your pots are completely clean, dust and algae free. Soak your pots in warm water, no soap, for about half an hour. Give your pots a scrub if need, making sure you remove all dust, dirt and stickers.
If you are re-using an old pot you may need to add a drop of bleach to kill off any algae. Rinse thoroughly and allow to dry completely.
Decide On You’re Design
So, whilst you pot is drying. You can spend a bit of time deciding on your design. Are you covering the whole outside of the pot or having an image in the middle of a painted background.
For an image on a plain background, you need to be a lot more careful when you are cutting your image out.
Base Coat Your Pot
Base coating for decoupage on clay pots is optional. You can just glue your image straight onto the pot.
However, if you intend to use light colored paper napkins for instance on a terracotta pot your image will be dulled and the use of a white acrylic paint as a base coat could significantly improve the finish of your project.
Alternatively, if you are using a centered image you may want a colored background in which case you would do all the background colors first and then add the decoupage.
Allow drying completely before adding your images.
Adding The images
Paint glue onto the surface of your project. Attach your first image layer and paint more glue over the surface of the image. Repeat until all images are fixed on.
Seal Your Project
How you seal your decoupage clay pots will depend on your intended use of the pots. For instance, if you are going to use it to hold pens and pencils, sat in a dry room on your desk, then the use of PVA or Modge Podge glue will probably do the trick.
However, if you intend to add soil to the pot, you will need to ensure that you have used a good quality clear varnish both inside and out, leaving no gaps. As moisture from the soil will absorb through the pot and onto your design and it won’t last very long.
Equally, if your decoupage clay pot project is to be left outside in the weather then you need to use a good outside, weatherproof sealant.
Now that you have an idea of how to decoupage clay pots, it’s time for you to give it a try.
Decoupage Clay Pots Projects
Pink Bird Pot
Lovely little bird and roses image.
Decoupaged on a pink background.
Tea Light Holder
- Craft Ideas
Even broken pots are useful.
The decoupage on the inside is just perfect for a tea light.
Cute Little Robin
- Fave Crafts
A more rustic look on the rim
and decoupaged text overlay
with a lovely Robbin
Shabby Chic Roses
Elegant Pink Roses over a shabby chic background
How to Make a Bird Feeder From Clay Pots
Things You’ll Need
- Terra cotta pot
- Colorful paper or paper cutouts
- Gesso
- Mod Podge
- Foam brush
- Scissors
- Acrylic sealer spray
Terra cotta pots are commonly used to hold flowers and decorate gardens. However, these simple red clay pots lack color, detail and personality. Decorating your plain terra cotta pots using the art of decoupage is extremely easy, and will add style and flair to your garden. Using basic craft supplies, you can decoupage any image or design onto a terra cotta pot.
Use a damp cloth to wipe down the entire surface of the pot to remove any dust, dirt or debris.
Paint a thin coat of gesso over the entire surface of the pot. When you are finished, there should be none of the original red color showing through. Allow the gesso to dry thoroughly before proceeding.
Cut out any paper designs or images you want to put on the pot. Printed scrapbook papers are a versatile paper type to consider using. These papers come in a variety of colors and patterns.
Apply a thin coat of Mod Podge to the back of one of the paper cutouts. Adhere it to the pot. Continue adding papers until you are satisfied with the finish. You may choose to cover the entire surface of the pot, or only in a few places.
Use the foam brush to apply a coat of Mod Podge over the surface of the paper. Allow the Mod Podge to dry before continuing.
Add four more coats of Mod Podge over the paper, allowing each coat to dry before applying the next.
Spray the entire surface of the pot with the acrylic sealer spray. This will weatherproof the pot and make it safe to put outside in your garden.
Sharing is caring!
Learn how to make a DIY flower pot with decoupage. I love using decoupage to make unique projects like this floral dresser.
Spring is in the air and I’m looking forward to getting flowers for the front yard. Here in Maryland, I typically wait until Mother’s Day to avoid frost killing my plants though. Until that time, inside plants will have to do. So I made some decoupaged flower pots.
This post contains affiliate links. By purchasing an item through an affiliate link, I earn a small commission at no extra cost to you.
How to Choose a Flower Pot for Decoupage
Look for a pot with flat sides for the best results. I used this pot with scalloped edges because it was too cute to pass up. A square or cylindrical pot would have been easier. But the good thing about decoupage is that paper bends.
My pots came from the dollar store and they’re plastic.
If your pot doesn’t have a hole at the bottom, you can use a drill to make a hole in it. This pot is plastic, so I used a regular drill bit. For ceramic pots, use a special bit with water and go slow.
How to Make a DIY Flower Pot with Decoupage
Supplies Needed
- Flower Pots(similar)
- White Spray Paint
- Patterned Tissue Paper(similar)
- Decoupage Glue
- Scissors
- Foam Brush
- Clear Spray Paint (optional)
- Spray paint your flower pot white. Your flower pot color will show through the tissue paper, so it’s important to start with white. I used satin, but flat would work too.
- Spray on the inside as well to cover the edges.
- Cut your tissue paper into pieces. Since my tissue paper is floral, I cut around the motifs, but random shapes work as well.
- Paint the decoupage glue onto your pot.
- Start applying the cut out tissue paper to your pot. You can start at the bottom like I did or you can start with the largest images.
- Smooth the tissue paper as you go, applying a layer of glue to the top.
- Use smaller pieces to fill in the gaps.
- For tiny gaps, I cut small pieces of the tissue paper to use.
- For the edges, make small cuts at the corners and bend the paper over.
- Use small pieces to cover the top part of the inside of the pot.
- Let the glue dry.
- Give the tissue paper one more coat of decoupage glue for added protection.
- For more protection, add a few coats of clear spray paint.
Tips To Use Decoupaged Flower Pots Outside
A decoupaged flower pot will be fine for indoor use, but what if you want to use your pot outside? Here are some precautions you should take to protect your hard work.
- Start by priming the pot because you spray paint it. If you’re using a plastic flower pot, you might want to use specialty spray paint for plastic pots.
- Decoupage as instructed, but use outdoor glue instead.
- After your project is finished, spray it with several light coats of clear spray paint.
You might also like:
Emy is a vintage obsessed mama of 2 DIYer who loves sharing affordable solutions for common home problems. You don’t need a giant budget to create a lovely home. Read more…
How to recycle plastic plant pots using a simple method of decoupaging with wrapping paper or fabric.
If you have plastic plant pots left over from spring planting, use them to make creative, inexpensive decoupaged pot sleeves for your own home decor or homemade gifts for Mother’s Day or other occasions.
With newspaper to make a pattern, some craft glue, a bit of masking tape, and wrapping paper or fabric, you can create unique pots decorated to suit any season or color scheme.
The first installment of this video by Art Sheree takes you through some simple steps to make a newspaper pattern to fit your plant pot or other containers. No need to measure or get too persnickty – you just wrap the paper around, tape to fit, then cut around the top and bottom for a custom-made pattern that will fit your pot exactly.
Once you have the procedure down pat, you’ll know how to reproduce this method of pattern making for any pot or recyclable container.
In Part 2, Art Sheree takes this recycling project to completion, showing you how to cut the pattern from wrapping paper (or fabric, if you prefer).
After cutting your material to fit, the remainder of this decoupage project involves applying several layers of craft glue for adhesion and protection, as well as preparing the surface for a final gloss coat of sealer.
I’ve used this method to decorate a plastic pot with pansy theme wrapping paper, inserting a smaller pot of blooming yellow and purple pansies, as a Welcome to the Neighbourhood gift for a young couple who just moved in nearby. I’ve also done a lego version on a large pot used as storage for small lego parts.
That’s the beauty of this idea – you can take a throwaway plastic pot, keep plastic out of the landfill, decorate with decoupage, then light up a dark corner of your home or bring a spot of joy to a friend. It’s all good.
You must be logged in to add a private note. Login | Register
My Notes
Share This Link
We are adding the craft to your Craft Projects.
The project was added to your Craft Projects.
You must be logged in to save a project. Login | Register
From the blogger: “Learn how to create gorgeous flower pots using pretty napkins and decoupage. These stacked flower pots look hand-painted and add a custom touch to your container garden. Get a full tutorial on how to get the best results with decoupage, including simple techniques to prevent sticking and to seal your final project properly. Plus, there’s a step-by-step video that lets you follow along. You can transform the look and feel of your outdoor garden and patio with this simple DIY project.”
Estimated Cost $11-$20
Time to Complete Weekend project
Primary Technique General Crafts
Materials List
- Terracotta pot
- Clay pot sealer
- Chalk paint
- Decorative napkins
- Decoupage glue
- Paint brushes
Instructions
Seal the terracotta pots inside before painting.
Paint a base coat on the exterior of the pot. Let dry completely.
Separate napkin plies to isolate the printed layer.
Apply decoupage glue in sections and place the printed layer of napkin down carefully until the pot is covered with the desired pattern. Let dry.
Apply top coat of decoupage glue. (See related blog post for specific formula needed for outdoor use.)
Notes Learn how to paint terracotta pots in a related post to create a complete stacked pot display.
How to Decoupage Pots – DIY Garden Ideas
Have you ever painted a clay pot and the paint eventually bubbled up, after leaving it outside in the weather? This is the solution to that problem. There’s so many beautiful wrapping papers, napkins, posters, etc. that you can use when decorating your clay pots. Some people put pictures of movie stars on their clay posts and it looks really cool. This is so much fun and they turn out so lovely. I’ve painted a lot of clay and plastic pots and the weather has a tendency to ruin them over time…well, not anymore! I’m so glad to have found this tutorial. I’m amazed at what people think of!
This would be a beautiful and inexpensive decoration for a wedding or any other special occasions! This is a must do! I made some for my garden and just love the way they look!
She paints the pot the color she wants to show through the designs and paints the inside of the pot with decoupage glue to seal it, and lets it dry for 1 hr. Then she places the pot in a cold oven. Set oven to 300 degrees and when oven reaches that temperature, set the timer for 30 min. and turn the oven off after that and leave pot in oven to cool down a few hours. Prepare your napkins or wrapping paper you want to use on the pot, next she applies the decoupage glue and gently applies the flowers. She uses a piece of saran wrap to gently put pressure on the flowers, in order not to tear them. She also uses a nail file around the top edge of the pot for any paper that is hanging over the edge. Once the decoupage glue has dried and you have all your designs on the pot, brush decoupage glue over the whole pot. Then she sets to oven to 170 degrees and puts the pot in the oven, then she turns the oven off, leaving the pot in the oven for 20-30 min. Next, she uses Rust-Oleum Marine Coating Spar (Clear) Varnish to seal the pot and lets it dry in a box with a closed lid for about 10 hrs.
Watch this step by step tutorial and see how she does this!
Solutions
Share on ThriftyFun This page contains the following solutions. Have something to add? Please share your solution!
Recycled Plastic Flower Pot
One of my pot plants recently withered and died, but the plastic flower pot was still in a very good condition. I decided to recycle this pot, by using decoupage techniques. I wanted to turn this pot into a gift container. Packing small bath treats into the finished pot made something exceptional from something that otherwise would have ended up in the rubbish bin.
Approximate Time: 1 hour 30 minutes
Supplies:
- a 4.7 inch plastic flower pot
- a 10/32 inch paint brush
- white water-based primer
- Paper Seal
- Deco Art Glue
- Modge Podge
- water-based varnish
- soft pink acrylic paint
- hairdryer
- pictures of pink pansies
- a pair of standard scissors
- a few sheets of old newspapers to protect the working area
For the Gift:
- 20 x 40 inch transparent cellophane gift wrap
- pink sparkle shreds
- a handmade rose-flavoured glycerine soap
- 2 pink fizz balls
- 3 pink bath pearls
- three small flower-shaped glycerine soaps
- a few strands of raffia
Instructions:
Wash the pot in warm soapy water and dry it thoroughly with an old cloth.
With a slightly wet 10/32 inch brush, paint a thin layer of the white water-based primer over the outside of the pot. Do not paint the bottom of the pot, and paint the sides of the pot up to where the top rim starts to protrude. Dry it thoroughly with a hairdryer – be careful not to use the highest heat setting on the hairdryer, as the pot might become too hot to handle.
Add a second coat of soft pink-colored acrylic paint and again, dry it thoroughly with a hairdryer.
If you need photos of pink pansies, drag this photo to you desktop and print. It may be necessary to resize the pictures of the pansies and then print them, I used 20 pansies for the pot.
With the 10/32 inch brush, paint a thin layer of Paper Seal over the printout of the pansies. The Paper Seal will protect the ink from running and will make it easier to cut out the pictures without tearing them.
Cut out the pansies and decide how they will be placed on the pot.
With the 10/32 inch brush, paint a substantial amount of Deco Art Glue to the back of the first pansy. Turn the pansy around and put it in position on the pot, but do not press it down.
With the brush, spread glue to the front of the pansy, lightly applying pressure so that it will stick to the pot.
Working from the middle of the pansy, and from inside towards the outside, rub out all the air bubbles and excess glue from the back of the pansy. Use an old cloth to clear any excess glue from the pot.
Repeat steps 9-11 with the other pansies. The pansies should “bloom” all around the pot.
Use the hairdryer to dry all the pansies thoroughly.
With the 10/32 inch brush, paint a thin layer of Modge Podge over the painted part of the pot. The Modge Podge will protect the pictures and give the product a smoother finish.
Dry the pot thoroughly with a hairdryer.
Repeat steps 13-14. You need to apply at least 6 coats of Modge Podge, but remember that with every layer, the direction in which the Modge Podge is applied, must be changed from horizontal to vertical to horizontal, etc. Also, remember that after every layer of Modge Podge, the pot must first be dried thoroughly with the hairdryer.
We love the look of fabric covered pots and this craft is so easy! We’ll show you how to decoupage with fabric and Mod Podge to make a trio of flowery pots. We are Plaid Ambassadors and get all kinds of wonderful paint and other craft materials from Plaid. We love their products and used their craft paints and Mod Podge for this project.
Here’s a video tutorial we made showing just how we covered the terra cotta pots with fabric. Watch the video then use the steps below to make your own Decoupaged Terra Cotta Pots.
Disclosure: This post has some affiliate links for products we think you’ll like. Even if you don’t want to buy the items online, we think it’s helpful to see what they look like, so you can buy them at your local craft store. If you make a purchase from one of these links, we’ll make a small commission. There is no additional cost to you at all, but it helps us a little so we can pay for our web hosting and the tools and materials we use in these videos and blog posts. All opinions are our own from our own personal experience.
Materials
Steps
1. To get started, prime the little pot with white spray paint primer.
2. Next paint the outer rim and inside of the pot with blue craft paint. Use the flat side of the craft paintbrush to get a sharp line under the lip of the pot. Leave the sides of the pot white. This is where the fabric will go.
3. Make a template for the fabric. To do this, wrap a piece of tissue paper around the pot. Use a pencil to make the tissue under the lip of the pot and around the bottom edge of the pot. Mark the ends too, where the tissue wraps around to the beginning.
Cut out the template.
4. Lay the template on the fabric to select a portion of the fabric you want to show on the pot.
Use the straight pins to attach the tissue paper to the fabric.
Cut out the fabric.
5. Next decoupage the fabric onto the pot using the Outdoor Mod Podge. To do this, paint a generous layer of Mod Podge around the sides of the pot.
Carefully line up the fabric on the pot and press it onto the pot. Use your finger to press out any wrinkles.
6. Finally, coat the outside of the fabric with Outdoor Mod Podge. Also paint the lip and inside the of the pot with the Mod Podge. Let dry.
This technique works for any size terra cotta pots. We chose these tiny ones because the trio of them is sooo cute! Wouldn’t these make a sweet gift planted with herbs or succulents? Let us know if you make them!
Happy Crafting,
Jennifer & Kitty
We love getting Pinned!
Have you ever wondered how to decoupage with napkins?
Look no further, friend! I have an easy tutorial for you, and I hope I will inspire you today to decoupage a pretty planter or pot for your home or for a friend! It truly makes an excellent gift for someone who loves lovely planters and plants.
Today I am joining forces with many other wonderful bloggers on a SPRING DIY. This amazing and inspiring blog hop is hosted by Krista over at The Happy Housie. I can’t wait for you to see ALL these wonderful Spring DIY projects! So much to see!
But first! Let’s decoupage!
I have done decoupaging terra cotta pots with napkins but it was many many years ago, and today I wanted to refresh this easy craft that anyone can do using a pretty piece of napkin.
…and a super inexpensive planter or pot.
I had a lovely napkin in my drawer that I picked up at IKEA last year. It’s really so amazing. Just wait until you see it!
Don’t you think this napkin is so uniquely beautiful?
Spring is all about FLOWERS for me. I love the season for all its blooms and beautiful flowers and it was not much of a brainstorm to come up with what to do with these gorgeous napkins.
I chose to make this easy DIY craft again.
Materials you will need for the decoupage project:
(affiliate links are included in this post!)
It sounds like a lot of materials at first but trust me; you most likely have all of these items at home.
I picked up these pots at my local Home Depot for a $1.29 each. Yup! So if you have THD close by, head over and pick up some of these pots!
And being able to turn this simple terra cotta planter to a ridiculously stunning home decor item in 10 minutes was the best part of this unexpected project!
Steps to decoupage with napkins:
- I started by painting the terra cotta pots with the white acrylic paint.
- In the meantime, I cut the design out from the napkin. I cut around the floral pattern.
- Once the paint was dry, I applied a thin layer Mod-Podge on the pot.
- Then I separated the napkin ply. You HAVE to do this step. Only use the one thin ply of the napkin.
- After I separated the napkin, I carefully smoothed the napkin onto the pot.
- As the last step, I applied a thin layer of Mod-Podge on the napkin and I let it completely dry.
I created a quick video of how I did it so you can easily follow this fun tutorial. I think seeing what I was doing is much better!
One quick tip:
Use a plant that is planted in a plastic planter since the terracotta pots are going to let water pass through and it would ruin your pretty napkins eventually.
Before you leave be sure to visit my super talented friends for more inspiration!
And today I’m joined by a fabulous group of blogging friends who are also sharing their Spring DIY Projects as part of the Seasonal Simplicity Spring Series. You’re going to love all this springy inspiration…
July 17, 2019 by Linda
This Mod Podge DIY flower pot is a great Mother’s Day gift for moms and grandparents alike – and would also make a great table centerpiece!
Skills Required: Beginner. I recommend having prior crafting experience before attempting this project, but it doesn’t have to be much. You’re going to be Mod Podging paper to terra cotta, which is relatively easy. Learn more here.
Hello, all! It’s Linda, from burlap+blue, here with another easy, crafty, and creative way to create with Mod Podge – a DIY flower pot! Spring isn’t officially here yet, but spring holidays are on my mind-especially Easter and Mother’s Day!
This decoupage DIY flower pot is a great Mother’s Day gift for moms and grandparents alike, and would also make an adorable Easter gift or centerpiece.
Here’s how to make a custom photo planter using decoupage medium and your own photos!
DIY Flower Pots
Gather These Supplies
- Mod Podge Gloss
- Photos printed with a laserjet printer
- Foam Brush
- Ribbon
- Terra Cotta Pot
- Hot Glue Gun
- Spray Primer (optional)
Step 1: I started by spray painting my planter white, but this is completely optional! To get your photos, use Photoshop or another photo editing software (I know most can do this!), to take your images and resize them.
From just under the rim of my planter to the bottom was approximately 3″. I wanted to make two rows of photos, so I sized my photos 1.5″ tall by 1″ wide.
I resized 20 photos, and also converted them to black and white (also optional). Print out your photos onto glossy paper using laserjet ink.
Step 2: Cut out your photos, and decoupage them onto your planter. This took a few minutes, so you may want to do this in front of an episode of your favorite show (I mod podged to Parenthood and the time flew by!).
You’re halfway there!
Step 3: Once your photos are decoupaged down, let dry, and seal with three thin coats of Mod Podge, being sure to let each coat dry fully before applying the next. Use Mod Podge or hot glue to affix a length of ribbon around the rim of your planter.
Step 4: For a finishing touch, add a bow to your planter! Take a length of ribbon and hot glue the two ends together (first picture above). Press the middle of the ribbon together in the center, and attach with another drop of glue (second picture above).
Take a smaller length of ribbon, wrap it around the middle, and hot glue it in place (third picture above). Take your finished bow and attach it to your planter.
And that’s it! Your DIY flower pot is complete. Add a plant, give a gift, and make someone’s day!
Thank you so much for letting me share my DIY photo planter with you all today!
When I was a little girl, my older sister was really into mod podge and decoupaging. She made me a beautiful wooden purse which she painted, decoupaged pictures, lined with felt, and added a handle. I LOVED that purse. Like so many things of the 70s, (like crazy bell bottom pants returning as stylish flares), decoupage has gone from folksy to classy.
I’ve been so inspired by all the projects made from mod podge on pinterest. It inspired me to decoupage a desk (see it here). Okay, so I have done a modern piece with paper but I’ve been seeing people decoupage with fabric. I really wanted to try this out. Here’s my first project.
My inspiration for this project came from, you guessed it, pinterest. It is a project by Christine Chitnis (you can find her insructions here). This is the picture I saw that made me say, “this is going to be my first fabric decoupage project).
Reading Christine’s instructions, she cut her fabric in a large piece and I felt that I would find her technique cumbersome (and I don’t do well with frustration when I’m doing a brand new technique). So, here’s what I did.
How to Make Decoupage Fabric Pots
Looking for a craft idea that is easy, cheap and quick but looks nothing of the sort? These are always my favorite types of DIY, the enjoyable one that look amazing but don’t take serious artistic talent or making 10 of them before you know even really know how to make the thing. Check out this tutorial video for making decoupage pots with only fabric and mod podge matte glue with the terra cotta pot of your choice. A perfect quick DIY gift idea, we’ve given these to teachers, friends and even Mom. Add flowers, a plant, a succulent or even a mix of candy.
My sister in law wanted an easy project for her regular girls night out where they always make a different little something. Since she knows I make all sorts of things, she came asking for some suggestions. I already thought this DIY was stellar, but when she and 10 friends tried this, they voted it “Best Craft Ever” and they have tried lots. This one is super for those who were not born with lots of artistic skill, but super for those who were. All of them turn out cute, too! Pretty amazing.
I have some in my kitchen window and they make me smile every time I see them. Learn how to make some of these cool DIY planters for yourself.
If you happen to have cute fabric scraps laying around, this craft project is practically free. Old denim jeans and bandanas look great, too. Let your creativity go wild on this one when it comes to cool fabric ideas. The project itself is super simple but very rewarding.
Supplies Needed:
Terra Cotta Pots
(all sizes will work if you have the fabric to cover them)
Fabric Scraps long enough to go around each pot with 2 inch longer than top and bottom) *Lightweight fabrics work best, fat quarters are great, but you can even use thin denim, especially the stretchy kind
Mod Podge Matte
Scissors
Foam Brush For Glue
Step 1
Start by cutting your fabric. Lay the fabric out, then the pot. Wrap fabric around, making sure you have at least two inches over the top and an inch longer than the bottom, with an additional 2 inches allowed for seam. It is ok if the fabric is slightly larger than this, but not smaller. Cut to size.
Step 2
Get one terra cotta pot and paint entire outside and bottom with glue. Do not paint inside. Allow to dry for 2 min. Place fabric vertically along pot from top to bottom and press in place. Continue wrapping fabric around pot, stretching slightly while going around pot until you get back to the side where you started gluing.
Step 3
Now, trim the fabric on the bottom of the pot. You want to leave about ¾ of an inch all the way around, but the measurement does not have to be precise. After trimming, snip notches into the fabric along bottom at every inch, but do not cut all the way to the bottom of the pot. You want to leave about ¼ inch of each snipped notch uncut when it gets close to the bottom pot edge. You should end up with small flaps all the way around the bottom of the pot. Now, coat these fabric pieces with your brush covered in glue and then press them down until they stick to the pot and each other.
Love this idea? Pin and save to Pinterest
Step 4
Coat this bottom portion as well as the sides of the pot covered in fabric with another later of Mod Podge. You should soak the fabric thoroughly with glue but not have large drips of the Mod Podge. Allow to dry for at least a few minutes.
Step 5
For the top of the top, you should still have the loose fabric along the edge. Trim this so that you have about a 1 ½ inches all the way around, perhaps a bit less if your pot is a tiny one. Cut notches into the fabric using the same method you did on the bottom, cutting in but not all the way to the edge of the pot. Once all of your flaps cut along the top edge are cut, you may glue them in place. Coat the back of the fabric with glue all the way around, then press them in place. Coat the inside edge with a layer of Mod Podge.
By: Diane Steinbach
21 September, 2017
Plastic plant pots are inexpensive and lightweight but not always attractive. You can customize your plastic pots with a variety of materials and transform them from a utilitarian object to an object of art. Clean and dry your plastic pots to get started, then heat up your hot glue gun and have your spray shellac handy to complete numerous pots in no time at all.
Purchase colorful glass discs from your hobby shop. Hot glue glass discs to the outside of the pot to cover it completely.
Collect silk flowers with large, flat flower blooms. Cut the flowers heads off the stems and hot glue the silk flower buds around the plastic pot to cover it completely.
- Plastic plant pots are inexpensive and lightweight but not always attractive.
- Clean and dry your plastic pots to get started, then heat up your hot glue gun and have your spray shellac handy to complete numerous pots in no time at all.
Apply faux rust or copper finish. Faux finishes can be brushed on to a plastic pot with a two-step process and can transform a plain plastic pot into an heirloom-style antique.
Take an old jigsaw puzzle and attach it to the pot with hot glue. Bend pieces slightly to fit them around the pot then seal the project with spray shellac.
Hot glue toy cars onto a plastic pot to prepare it for a kid’s room. Make it even more fun by painting a road on the pot with acrylic paint first.
Decoupage your plastic pot. Rip up plain brown paper bags and attach to the pot with decoupage medium. Crinkle brown paper first to add more texture, then seal with a final coat of decoupage medium.
- Apply faux rust or copper finish.
- Bend pieces slightly to fit them around the pot then seal the project with spray shellac.
Paint your children’s hands with acrylic paints, then press along the sides of the pot to leave colorful prints. Add a few paw prints from your family pets to make it even more whimsical. Seal with spray shellac or a clear weatherproof sealant.
Hot glue bark from trees, leaves, moss and twigs to the outside of the pot. Use spray shellac to seal the project and protect it from dampness.
Spray the entire pot with spray glue. Roll the pot in beach sand to cover. Hot glue seashells onto the bottom of the pot and use spray shellac to seal.
- Paint your children’s hands with acrylic paints, then press along the sides of the pot to leave colorful prints.
- Use spray shellac to seal the project and protect it from dampness.
Personalize your jigsaw puzzle pot. Create a photo puzzle using your own photographs and then use those pieces to cover the pot.
Don’t place pots that are covered with paper or silk flowers exposed to the elements outdoors. Keep them sheltered or indoors to preserve your hard work.
How to Decoupage Terra Cotta Pots
Things You’ll Need
- Photographs
- Photo printer
- Printer paper
- Decorative paper (optional)
- Scissors
- Craft glue
- Small bowl
- Paintbrush
Decorating a flowerpot turns a plain flowerpot into a pot as eye-catching as the plant itself. Although you could paint the flowerpot using acrylic paints and then seal it with an outdoor sealant, using photographs to decorate transforms the pot into something special. A photo memory flowerpot is an easy way to display photographs from a special memory. Place the completed pot on your windowsill, then add your own décor or give it as a gift instead of the giving a gift of a traditional photo in a frame.
Print photographs using a photo printer. Do not use photo paper, since the chemicals will bleed when you attempt to glue them on the pot. Instead, use a standard printer paper or decorative paper of your choice. The number of photographs needed vary depending on the size flowerpot you choose and the size photographs you print. However, for a medium sized flowerpot using 4-by-6-inch photographs, you need three.
Trim the photographs with scissors to remove excess paper.
Mix together two parts white craft glue and one part warm water in a small bowl. Stir to combine. You want the glue thin, but still opaque.
Apply the glue you created in Step 3 onto the back of the photographs using a paintbrush. Place the photographs onto the flowerpots with the images facing out. Smooth them out with your fingers to remove any air bubbles.
Paint a second layer of glue on top of the photographs. Allow the glue to dry overnight.
Using a photo printer ensures the pictures are higher quality than using a standard printer.
If desired, cover the entire flowerpot with decorative paper before adding the photographs. Or, use a paper memento to cover the flowerpot first. For example, use a wedding program with wedding photographs or a map with summer vacation photos. This will cover the exposed areas of the flowerpot the photographs do not cover.
To create an antiqued look, print the photos in sepia tones. Then, add 1 to 2 drops of brown food color to the glue mixture.
Many people want to change their homes. There are no obstacles to the dream. Do not necessarily buy hand-painted interior items, if you want this exclusive. Can not draw a picture? Do not need! Decoupage of flower pots is, perhaps, the first test step to the global decoration of all surrounding objects.
First, you should choose the right decor object. If you are going to do decoupage pots, it is better if they are made of clay, uncovered with varnish or other ornaments. You can also use wooden decorative pots, which are placed with flowers. Plastic options are also suitable, but sometimes working with it is a bit complicated.
First of all, it is necessary to decide on thedrawing. Decoupage of flower pots can be carried out using all possible materials on which the picture is placed: paper, napkins, special decoupage sheets, wallpaper, cloth, etc. But it’s better if the base is thin. Many needlewomen have managed to get thin blanks even from album sheets. It is done this way: an image is printed, then it must dry, then stick the tape and carefully remove it. On the scotch there are pieces of paper, and it is thin.
If you do not want to fool with such an option,then the usual multi-layer napkins with the drawing you like will do. When the decoupage of pots is carried out, the napkin is stratified and only the image is printed. But after selecting the picture, prepare the surface of the flower pot. For this, all irregularities and roughness must be ground. Usually, this requires fine sandpaper No. 0. Next, the surface is primed and painted.
The selected pattern must be cut, and if the colorthe pot coincides with the background on the napkin, then you can not cut out the small details, but leave small allowances, which then mask the background paint. Then follows directly decoupage of flower pots. The decor is fixed with glue PVA, diluted with water or special glue for decoupage. You can put it on a pot, on a drawing from the back or on top of a drawing, attaching it to a pot. It is better to moisten the decor – so it will fix on the surface (this, if you decide to use the latter method). Be sure to apply glue all over the surface of the image. After this, you must superimpose a transparent file or something similar and carefully, stroking movements to remove air from under the pattern. Usually, a soft rubber spatula is used for this.
From above all cover or a water-based varnish(if the pot material absorbs water), or acrylic. For the option is matte and glossy varnish. It’s better if there are several layers – so the decor will last longer. By the way, the application of varnish is necessary only after the previous layer has dried.
Decoupage bills can also be carried outyourself. Usually such a gift is given to men, but women will not refuse such a presentation. It is done in the same way as decoupage of flower pots. But there are some amendments. Usually, the banknotes are made of wood, and it does not always require a primer. Instead of a paint for a background, you can use a stain. Varnish for final fixing of the decor is water-based.
Excellent work with the applicationvarnish-craquelure. It is applied after applying one coat of protective varnish or before it. With the help of craquelure, it is possible to artificially age the image, which will only give a good quality to the product. In order for the cracks formed after drying to have a more expressive appearance, they can be painted over with pastels, shiny powders, etc.
And remember that handwork was always appreciatedhigher than industrial. A gift made with love, be sure to like. And it does not matter what it will be: decoupage of a banker, a flower pot or just a beautiful frame.
Love your family and please them with your creativity!
The decoupage is a very simple and beautiful technique. Once you learn it, you can transform any object in a work of art. It’s already summer and we spent more time in the garden and on gardening work. Therefore we are going to show you how to decoupage a clay pot with fabric and a watering can with paper. In the spring-summer season you can proudly decorate your kitchen windowsill or any other place at home.
How to decoupage a watering can
First of all, you need a good watering can, then apply a primer. Wait the primer to dry for about 20 minutes.
How to decoupage and to make a patina effect
Then paint the watering with white acrylic paint. Lay another two layers after the first layer has dried.
Paint with a green acrylic paint the spout and handle of the watering can.
To give it a patina effect, paint with a dry brush, lightly dipped in green paint.
Add a darker green hue
Now glue stickers or printed decorative art pictures
Add some embellishments like this butterfly and raffia ribbon
With creativity, fabric scraps and a little paint you can turn a flower clay pot in a lovely decor piece. See how to decoupage with fabric in the next step-by-step tutorial.
You need: a clay pot, 4 x 4 cm pieces of fabric in the colors orange, pastel, colored pink and green, white paint, brush, sandpaper, white glue, marker for fabric, varnish, raffia ribbon, scissors.
Sand the piece to remove imperfections and lay a coat of white paint.
Glue the fabric scraps on the clay pot so that one piece overlaps the other. The inside could be fully painted instead of decoupaged.
With a fabric pen, make stitchings around the fabric scraps. Lay a coat of varnish.
Make a bow with a raffia ribbon and it’s ready!
ABOUT THE AUTHOR
Jenny Harrington
Terra cotta flower pots are readily available and inexpensive, but fairly boring in appearance. Jazz them up by adding photos to their surface. Use photos of people or your favorite artwork. You can also cut the photos from the fronts of seed packets and affix these to the pot, which is especially attractive for potted herb gardens. Use decoupage techniques to create a waterproof design with your pictures so that the pots are as useful as they are attractive.
Things You’ll Need
Step 1
Cut your picture so it fits on the terracotta pot. Use decorative-edge scissors if desired.
Step 2
Coat the surface of the pot with decoupage glue, using a foam paintbrush to smooth the glue on evenly. Smooth the picture onto the glue. Push any air bubbles out from underneath the picture with your fingertips.
Step 3
Brush a second coat of decoupage glue over the top of the picture once the first coat has dried. Allow the second coat to dry completely, then apply another coat.
Step 4
Spray the surface of the pot with an acrylic or polyurethane sealer. The sealer makes the picture waterproof so you can plant in and clean the pot without damaging the art. Allow the sealer to dry for 24 hours.
Further decorate the pot with painted designs. Alternately, trace around the edges of the picture with puff paint, which gives the appearance of a frame around the art.
Combine mosaic work with the picture. Glue broken glass or flat glass marbles to the surface of the pot, placing them around the picture to form a frame.
Classic flower pots are versatile and perfect pieces to get your hands dirty in the DIY world. Of course, they’re great for planting flowers, small vegetables and herbs but they’re also great to use in craft rooms, kitchens and in some other surprising ways around the home. But instead of keeping them simple in their easy clay form, we’re here to show you how to try out your crafting skills and get creative with them! Let’s check out some fun ways to decorate your flower pots and add your own personal spin on them!
1. White-Dipped.
Modern and chic, dip your classic clay pots in a bit of crisp white paint for a posh look around the home. It contrast well with a vibrant green so it’s perfect to compliment your succulents or growing herbs.
2. Floral-Covered.
Grab some fabric scraps and get to work. This is the ultimate decoupage test and we love how you can change not only the color of your pots but the texture too with this idea.
3. Golden-Ombre.
There are too marvelously stylish accents happening here. Ombre blues highlight the pots and they’re all dipped in a sparkling, golden finish that will spruce up any windowsill or desk inside the house.
4. Chalkboard-Made.
Adding chalkboard accents to your pots can make labeling and remember so much easier. And if you ever want to reuse your pots, re-labeling is simple, especially since they’re still fashion-forward.
5. Puffy-Printed.
Puffy paint works well on these terra cotta pots too! It adds texture and helps you make printing and designing a whole new look so much easier.
6. Pastel-Colorblock.
For a lighter, more feminine look, go with pastels. But to keep it contemporary try out the color-blocking trend and get creative. We love this dessert-like finish and how delicate its new style is.
7. Stencil-Adorned.
Use stencils to get a more precise style. But use textural paint to get a more interesting look. Combined you can create something that stands out from the traditional look with much more pop and pizzazz than the usual.
8. Gem-Embellished.
You could always go with some embellished instead of paint! Gems, sequins and the like can make an entirely new look! Just look at this geometric style made easy with some craft glue.
9. Face-Planted.
Give your pots a face to go with their greenery. This could be a perfect way to get the family involved and have a craft night of sorts.
10. Twine-Wrapped.
This may be one of the easiest projects of the bunch. All you need is some twine to give your pots a rustic, beach-vibe that fits within a variety of funky themes.
11. Lace-Trimmed.
Lace can too be used to trim a clay pot. Adding delicacy and feminine charm to the clean foundation. We love the texture and innovation!
12. Glitter-Dressed.
Add pop and shine to your flower pops with this youthful and playful idea. Neon colors and glitter combine to make one of the most kid-friendly and vibrant of inspirations!
13. IKAT-Painted.
If you think you can swing it, try your hand at hand-painting some IKAT prints onto your pots. Different colors and size prints make this a playful and funky way to decorate.
How to Decoupage Clay Pots or Plastic Pot Sleeves
Decoupage is an easy craft technique that can be used very effectively on terra cotta pots or plastic pot sleeves. Because it is so simple to do, decoupage offers endless decorating possibilities.
In this project, we used paper napkins with an Easter egg theme, but you could use similar techniques to decorate a plant pot for any special occasion, or to suit the plant you have growing in it, or the decor of a particular room.
Plastic plant pot sleeves, of course, have the advantage of being easily removed or rotated to suit each season and will last longer because they don’t have direct contact with moisture from the growing plant.
Supplies:
- terra cotta pot or plastic plant pot sleeve
- decorative paper napkins, magazine pictures, gift wrap, wallpaper, seed packets, old postage stamps, or fabric
- decoupage medium, either gloss or matte finish or white glue thinned with an equal amount of water
- foam paint brush or soft bristle paint brush
- optional: craft paint or spray paint
Project Instructions:
1. Wash the pot or pot sleeve and let dry thoroughly. If desired, base coat the pot or the pot sleeve in a paint color that will work well under your chosen decoupage material.
The base color – either the original or the paint – will show through most paper napkin decoupage projects. You should therefore use a white pot sleeve, or paint your pot in a light color, if the original color will dull the final finish. For our project, the medium brown plastic pot sleeve was fine without paint. The base color is also less likely to show through thicker decoupage materials, such as magazine pages or some fabrics.
2. Cut or tear around the motifs that you wish to decoupage on the pot. If you want a central motif that will not be overlapped with other designs, then cut or tear around it, then cut or tear lots of other colored background pieces.
Vary the size of the decoupage pieces for the best effect.
Our project was completed using only egg shapes, or partial egg shapes, cut from one Easter theme paper napkin.
3. When working with paper napkins, usually the top printed layer of the napkin is carefully separated from the other layers and only the printed layer is used for decoupage. However, in this case, both layers of a two-ply napkin were used together for each egg shape.
4. Begin decoupaging by spreading a thin layer of decoupage medium over a portion of the plant pot or sleeve. Cut a straight line at the bottom of the first paper shape and align it at the bottom of the pot or sleeve, overlapping the bottom rim just a little. Press the paper down with your fingers, gently curving it over the rim. Coat the entire piece with decoupage medium, or thinned white glue, using the paint brush to carefully smooth it into place.
5. Continue adding more pieces, overlapping each piece as you go. Treat the pieces at the top of a plant pot sleeve in the same way as you did the bottom; cut the paper piece close to the rim, but overlap the rim a little and stick the overlap down on the inside of the pot.
On a plant pot that will be filled with moist soil, take the decoupage only to the rim, but trim it off without overlapping to the inside.
6. Once the pot or pot sleeve is completely covered, paint on one or two more coats of decoupage medium and let dry.
Suggestions:
Before decoupaging, consider sealing all surfaces of a terra cotta pot with polyurethane sealer or patio paint to protect the decoupage finish from moisture.
Use decorative-edging scissors to cut out the decoupage pieces for a unique effect.
Decoupage Terracotta Pots – Mod Podge, Napkins, Planters.
If you told 10-year-old me that 56-year-old me would be working on a decoupage project on Memorial Day weekend, 10-year-old me would be like (head tilt) and … your point is?
Now if you told 23-year-old me that in 33 years I would be working on a decoupage project on Memorial Day weekend, 23-year-old me (sitting on the beach in a bikini sipping a contraband beer) would break out in laughter.
Looks like 10-year-old me was right on the money. 😉
Because, for me, this Memorial Day weekend was spent with Mod Podge, terracotta pots, and a pair of scissors cutting flowers out of floral napkins …
and making some decoupage magic. 😉
with Mod Podge & Paper Napkins
Materials*
Soft Bristle Paint Brush
*includes affiliate links.
Give your terracotta pots a base coat of white paint. Then brush on some cream paint randomly.
Once dry, lightly distress with 80 grit sandpaper.
Cut out flowers from paper napkins. I also separated the napkin layers so these cut out flowers are single layer.
Apply a generous coat of Mod Podge.
Add paper napkin flowers to the Mod Podge areas.
This is when 10-year-old me would remind 56-year-old me to be careful and smooth out those wrinkles!
Add a coat of Mod Podge over the paper napkin flowers (this also helps to smooth out wrinkles.
Repeat adding flowers all around the pot.
When done, give the pots a generous coat of Mod Podge.
After about 1-2 hours, I went back and gave them all another coat of Mod Podge.
Just add some foliage.
My foliage is a fake from Ikea because 56-year-old me cannot be trusted with real plants.
And I’m pretty sure 10-year-old me and (absolutely positive) 23-year-old me suffered the same brown thumb affliction.
My mom used to joke that she could hear the plant in my Penn State dorm room gasping for water 300+ miles away. 🙂
Decoupage Terracotta Pots – Mod Podge, Napkins, Planters.
If you told 10-year-old me that 56-year-old me would be working on a decoupage project on Memorial Day weekend, 10-year-old me would be like (head tilt) and … your point is?
Now if you told 23-year-old me that in 33 years I would be working on a decoupage project on Memorial Day weekend, 23-year-old me (sitting on the beach in a bikini sipping a contraband beer) would break out in laughter.
Looks like 10-year-old me was right on the money. 😉
Because, for me, this Memorial Day weekend was spent with Mod Podge, terracotta pots, and a pair of scissors cutting flowers out of floral napkins …
and making some decoupage magic. 😉
with Mod Podge & Paper Napkins
Materials*
Soft Bristle Paint Brush
*includes affiliate links.
Give your terracotta pots a base coat of white paint. Then brush on some cream paint randomly.
Once dry, lightly distress with 80 grit sandpaper.
Cut out flowers from paper napkins. I also separated the napkin layers so these cut out flowers are single layer.
Apply a generous coat of Mod Podge.
Add paper napkin flowers to the Mod Podge areas.
This is when 10-year-old me would remind 56-year-old me to be careful and smooth out those wrinkles!
Add a coat of Mod Podge over the paper napkin flowers (this also helps to smooth out wrinkles.
Repeat adding flowers all around the pot.
When done, give the pots a generous coat of Mod Podge.
After about 1-2 hours, I went back and gave them all another coat of Mod Podge.
Just add some foliage.
My foliage is a fake from Ikea because 56-year-old me cannot be trusted with real plants.
And I’m pretty sure 10-year-old me and (absolutely positive) 23-year-old me suffered the same brown thumb affliction.
My mom used to joke that she could hear the plant in my Penn State dorm room gasping for water 300+ miles away. 🙂
February 2, 2017
Great tutorial on how to mod podge flower pots! These make great teacher and house-warming gifts and are the perfect craft for an adult craft night.
Thanks to Waverly Inspirations at Walmart for sponsoring this post. The favorable opinions of the incredibly cute fabrics, ribbons, and paint are 100% my own. Post contains affiliate links. Find my full disclosure policy here.
Every month, Waverly Inspirations sends me a box filled with fabrics, ribbons, and paints and challenges me to create something with their materials. I’m not much for games, but this is a game I can get behind! Some months I am given a theme to follow and others are designated as “designer’s choice”. This month’s theme was Valentine’s Day decor, and I knew immediately what I wanted to create! My boys love to give their teachers Valentine’s Day gifts, and I thought mod podged fabric flower pots would be perfect this year.
Supplies Needed for Mod Podge Flower Pots:
- Waverly Inspirations Fabric found at Walmart. (The floral Waverly fabric I used is only $3.97/yd and can be found here.)
- Waverly Inspirations Ribbon
- Outdoor Mod Podgeand foam paint brush
- Scissors (here is a link to the gold pair I own)
- Terra Cotta Pots
Instructions for Mod Podge Flower Pots:
Step 1: Place your flower pot in the right corner of your fabric, leaving about 1 1/2″ of fabric from the edge of your pot. This allows you to have enough fabric to fold over the lip of your pot. Roll your flower pot from left to right in an arch shape and trace the arch shape onto your fabric, keeping the 1 1/2″ fabric allowance.
Step 2: Cut out your fabric. The fabric does not have to be completely wrinkle-free and will smooth out with the glue.
Step 3: Use Outdoor Mod Podge and a sponge brush to paint your glue onto the body of your pot only. Do not yet place glue on the lip or the bottom of the pot. Working in small sections at a time is the key to success with this project!
Step 4: Smooth your fabric around the body of your pot and seal the seam of the fabric. If you have excess fabric, first cut it so the seam overlaps by only 1/4″ or so.
Step 5: Cut the excess fabric off the bottom of the pot.
Step 6: Cut slits in the fabric on the bottom of the pot every 1 1/2″-2″; coat with Mod Podge and press down.
Step 7: Repeat steps 5-6 on the top of the pot.
Step 8: Allow the pot to dry before sealing the exterior of the pot with additional coats of Mod Podge. Fill pots with plants, or gift basket supplies and give as gifts!
I created three pots to give as teachers’ gifts, but they look so cute on my dining room table that I’m beginning to have second thoughts! 🙂 I might have to make more!
For more clever and easy ways to use fabric, please check out my related posts below!
You know these cheap Dollar Store flower pots?
Instead of plopping your plants down into dull plastic pots, give your containers a dazzling designer upgrade, with these 8 gorgeous ideas from brilliant Hometalkers!
1. Antique your plastic pots
Wish you had a secret cottage garden of your own? Add century-old English garden pieces to your porch, by transforming ordinary plastic pots from the Dollar Store with just a bit of chalk paint!
2. Nail on slats of pallet wood
If you’ve got a crush on rustic decor, you’ll LOVE this! The middle step might look a little scary, but the result is amazing!
3. Spray paint a faux French patina
Looking for some tres magnifique dressing for your mantel or windowsill? Change the look of any cheap pot (even some unattractive finds, like these), with a pearly, French style makeover.
4. Paint a stoney finish
If your garden’s full of brick details and stoney ornaments, paint your pots to match, with this clever upgrade.
5. Cover the surface with sand
Are you a coastal decor addict? Us too! Cover a stack of .99 cent terra cotta pots in grainy sand, and top them off with pretty shells.
6. Paste on graphic transfers
If you’re head over heels for terra cotta, it’s time to step up your game, by printing or digging out your favorite graphic, and transferring the image to your flower pots.
7. Wrap your pots with rope
Does your outdoor dining area need a drop more interest? These rope wrapped planters are an easy way to add some texture to cheap terra cotta pots!
8. Decoupage pots in paper napkins
Raid the leftovers from your last cocktail party and reuse those pretty paper napkins to update a set of small pots.
9. Gild a pattern across the front
If you’re a modern design guru, these pastel painted pots lined with golden shapes are the $3 decoration your home is begging for.
10. Stamp it with a message
Whether you’re an admirer of miniature decor or not, you’ve probably just had your heart stolen by these little flower pots with stamped summertime messages. Think of all the sweet phrases you can add to yours!
Which designer pots will you add to your garden this summer? Let us know how you’re decorating your own!
Upcycle old plant pots and milk bottles with a spot of floral decoupage!
Already registered? Click Here to login
We’ve got two projects in one for you. With your download, you’ll discover tutorials to decoupage both plant pots and milk bottles – yippee! It’s the perfect way to introduce some new home accessories into your life without the cost.
More downloads
Bestselling colouring book illustrator Millie Marotta, author of Millie Marotta’s Animal Kingdom, has launched an initiative to get the nation colouring in to show appreciation for our NHS. Colouring has surged…
Inside this download pack is five pretty posters for your creative corner – whether you’ve got an entire room, an outbuilding or just a small corner in the study. Featuring famous…
Your FREE hamster treehouse project has been taken from Homemade For Hamsters by Carin Oliver £13.65, Firefly
Books) amazon.co.uk.
To download our templates, simply click ‘Download Now!’ and it will open in your browser. Why not send us a picture of your project once you’re done? For your chance to be…
Author by Ann Kollegger on April 10, 2020 Updated on May 12, 2020
This sweet fingerprint flower pot can be made with supplies you probably have on hand. This project will easily engage kids from 3-10 years old with a lot of creative steps and makes a perfect project for Spring!
Fingerprint Flower Pot Tutorial
These flower pots are a great keepsake for Mother’s Day or as a birthday present. It reminds me of this Bouquet of Fingerprint Flowers! In case you don’t have terra cotta pots, I’ve included some alternatives you can use instead.
You can extend this project by planting seeds in the pots and turning it into a science lesson by having kids document the sprout and growth of the seeds. Or, you may love the idea of creating Homemade Plantable Seed Paper that you can include with some soil as part of the gift!
Craft supplies you will need
- Assorted color acrylic paints (flowers)
- White and yellow acrylic paint (pot)
- Paintbrushes
- Terra cotta pot with base dish
- Green permanent marker or paint marker
- Fine grit sandpaper (if using plastic flower pot)
- A paint palette
- Newspaper or tablecloth to cover work surface
Alternatives:
- If you have old plastic pots, use a fine grit sandpaper and gently scuff up the outside so the paint sticks to the pot. You can see our complete tips for painting on plastic here.
- Paper cups work great too! I would skip steps 1-4 and start on step 5 below.
Optional:
- Soil and seeds
- Plastic wrap
- Rubber bands
Craft information
- Age Level: 3-10 years old. Younger kids (3-5) will need help with some steps.
- Mess Factor: Messy. Acrylic paint is permanent so make sure kids wear an apron or old shirt. Permanent marker will also stain and can wash off skin eventually.
- Time to Complete: 45 minutes including drying time.
- Cost estimate: 6” terra cotta pots are about $1.50 each.
Craft Tips
- As an alternative to using newspaper to cover my work surface, I use an old window shade. It is easy to clean and once dry, I roll it back up to use next time!
- To dry paint quickly, use a hair dryer on low setting.
- If the acrylic paint is too thick, mix in a couple drops of water to thin it out.
- If you are concerned about spilling paint, scoop some paint onto a damp sponge and have kids dip their fingers in the sponge instead.
How to Make a Fingerprint Pot:
- Make sure the flower pots are clean. Wash and dry as needed.
- Use the white acrylic paint to paint the outside of the pot and the dish. Dry with hair dryer on low setting. Repeat these steps until you have a nice white dry surface. It took me 4 coats of paint to get good cover.
- Mix a light yellow by adding yellow acrylic to the white in small amounts and mix with brush. Paint the rim of the terra cotta pot and the dish, or the bottom part of the plastic pot (or rim). It took 2 coats of yellow for each part that I painted. Dry with hair dryer.
- At this point, kids should stop and wash their hands, paint palette, and brushes.
- In the paint palette, mix up the colors you want to use for the fingerprint flowers.
- Choose 1 color and lightly press a finger into the paint and then “stamp” flower designs on the pot. Use the damp paper towel to wipe the paint off that finger and choose a different color and “stamp” additional designs on the pot. You can layer multiple colors on top for petals, and use your thumb and a different color for the center of the flower. Dry with hair dryer.
- At this point again, kids should stop and wash their hands.
- Using the green marker, add stems and leaves to the flowers.
Optional: Fill pot with soil mix and plant your seeds following the directions on the seed packet. Water soil until damp. Use a piece of plastic wrap to cover the top of the pot and secure with a rubber band. Put the pot in a sunny spot. Keep plastic wrap on until you see seeds start to sprout (usually 5-10 days) then remove.
This fingerprint flower pot is fun for kids to make and a perfect keepsake gift which can be kept for years to come! Plant seeds or flowers in them and enjoy their cheery spot on a windowsill.
You can even attach one of these Printable Mother’s Day Cards to make it even more special if you are giving this as a Mother’s Day gift.
With spring in the air and gardening and patio decorating in mind, I have been seeing cute little deco pots being featured in magazines and store displays. I thought I would take my crafting arsenal, some inexpensive clay pots and my digital scrap supplies and come up with an easy, inexpensive project that will look great on your porch.
Supplies used:
Clay pots (saucers optional)
foam brush
acrylic paint
Mod Podge
digital background paper and an enlarged element as a focal point for your deco pot
(Optional items would be any crackle glazing or paint, , Goosebumps texture spray, jute, ribbon or rick-rack, or whatever else your creative mind can come up with!)
Step 1 – Start by painting the rim of your clay pot with a color that will coordinate with the digital paper you are planning to use. Make sure you paint under the lip of the rim on the outside. It will not matter if some of the paint gets onto the part that will be covered with paper as it won’t show through. For a more finished look I painted down the inside of the pot about and inch and a half to where I think the dirt would come up to. Basically, you are just wanting to cover all the clay that will be seen after it has been decoupaged and filled for use.
Step 2 – While the paint is drying you can print your SG background papers. Resize your focal element, print, and cut out. I printed on regular cardstock. I also sprayed a sealer on my prints as I am using an ink jet and once I add my water-based Mod Podge I don’t want my ink to bleed.
Step 3 – You will begin to cover the base of the pot with the background print. You can either cut it into strips of about 3/4 of an inch in width and a bit longer than the measurement of the pot from the rim to the bottom , or you can tear in pieces for a more rustic collage look. Working in small sections, using your foam brush, brush Mod Podge onto the pot and then place a piece of the torn/cut background paper. Smooth it out as you go with your fingers working out any bubble or air pockets. Mod Podge over top of this paper and on the adjacent section of the pot adding another piece of background paper. You will continue to work in this manner, moving around your pot with layering Mod Podge on pot, adding paper, Mod Podge on top of paper, until your entire pot is covered. As you are working, make sure you continue to smooth out your paper as you want a direct contact of paper to the clay pot. Some wrinkling/puckering may occur which is ok – it adds character to your piece of art. Now your entire clay pot should be covered, add a final coat of Mod Podge on top of your paper so that the paper is now well sealed onto the pot. Let this dry (or use a blow dryer to speed it along) before proceeding to your focal.
Step 4 – Now it is time to apply your cut-out focal point. You will apply some Mod Podge to the back of your cut-out, then smooth it onto the surface of your pot, again working out any air bubbles. Once in place, Mod Podge over your focal cut-out and again let dry.
To add a vintage look, take a sanding block and distress the painted rim of your pot. Once you have it looking just how you want it, Mod Podge over it to seal. Add any finishing touches that suit your fancy; crackle glaze, jute, etcetera. All that is left is to fill with dirt and a plant and put on display!
Digital scrapbooking supplies used:
If you give this project a try, please be sure to post it to Scrap Girls Hybrid Layout Gallery so we can see your creation!
And as always . . . Enjoy the Process!!
Tutorial written by Lei Maier
Until the local nurseries open their doors for spring planting, my flower options are pretty much limited to the grocery store. Sure, we have florists in the area but they tend to get pricey, and since I like flowers in my house all the time I need to buy budget flowers. The only problem is … I don’t like their plastic pots with the paper wrapped around them. I solved that problem by transforming terra-cotta pots into beautiful decoupaged flower pots.
I wanted to bring a few spring blooms into the house but couldn’t bear to keep the flowers in their plastic pots. As long as I was in the floral section of the grocery store, I grabbed a few terra-cotta pots and saucers. They’re super cheap and I knew I could either paint or decoupage them.
I decided to decoupage them. With pretty paper napkins. I’ve seen this done with fabric, but I thought the paper napkins would be much easier to work with.
Here’s what I started with. Plain terra-cotta pots and paper napkins I found in the party aisle.
Working in sections, I brushed Mod Podge onto the terra-cotta pot, and then carefully pressed sections of napkin onto the pot. Wrinkles are good; they add a little character. Fold edges of the napkin under the bottom of the pot and to the inside. Carefully rub out air bubbles. Once the glue has dried, carefully brush a thin layer of Mod Podge over the napkin to protect the paper.
Let dry thoroughly before adding your flower or plant. I added a little raffia bow to this flower pot.
I repotted a purple hyacinth, a pink kalanchoe, and purple campanula.
Are you as ready for spring as I am? I noticed the daffodils are peeking up through the dirt out in the garden, and the crocuses will be in bloom in about 2 weeks. Soon!
At $2 apiece, I created custom decoupaged flower pots that I can use over and over. They look so much better than the cheap-o plastic pots and only took a few minutes to do. Give them a try! There are so many pretty paper napkins to use.
This post contains affiliate links.
They look lovely when they’re overflowing with herbs or planted with rambling roses. But just like your plants, terra cotta pots need a little care and attention to keep them from perishing outdoors. The clay is porous, which means it will absorb moisture from the soil and sustain damage when kept outdoors. Terra cotta pots are also prone to cracking in extreme temperatures, especially in cold winters. And that would leave your beautiful flowers without a home. There are a few different ways to protect them.
Seal of Approval
Before using a terra cotta pot, especially if keeping it outdoors, coat with a protective sealant. You can use a stone sealant such as those used for marble or granite floors. This will keep the water out and help protect the pot from the elements. First, clean the inside and outside with a damp cloth, and allow it to dry for a couple of hours. Use a foam paintbrush to apply a coat of exterior varnish inside the pot. Allow it to dry, then repeat on the outside. Once that’s dry, add a second coat.
True Colors
If you want to jazz up plain pots with some bright colors, paint it and allow it to dry before applying the sealant. The paint won’t bond well with the protective layer. Acrylic paints work well on terra cotta. You could even go wild with pretty pictures or patterns like candy stripes.
Glaze Over
Cheaper pots can be both upgraded and protected with a glaze. Spray inside and out with a waterproof sealer designed for brick and concrete. Allow to dry for 24 hours, then add a coat of all-surface primer. Once that’s dry, apply paint. You can use acrylic, chalk paint or leftover indoor paint. Leave for 24 hours before applying several coats of a high-gloss sealant or lacquer.
Invite Them In
Because they absorb moisture, terra cotta pots crack easily with extreme temperature changes as the clay expands and contracts. Waterproofing with sealant helps, but to be extra careful it may be worth bringing them indoors if a big freeze is coming. If they contain delicate plants that frost can also damage, you’ll be a savior twice over.
Raise Them Up
If bringing them indoors isn’t practical, or the plant prefers to be outside, raise the pots on bricks or move to a concrete surface. Otherwise, the pots may stick to wet ground when it freezes and will break when you try to move them. Likewise, if the pots are too big to store inside, you can tuck them underneath the eaves of your house, store them in a shed or cover them with a tarp to keep the worst of the weather at bay. Empty out any soil first and keep each pot separate (not stacked) and upside down.
It often seems like a flower pot just doesn’t look good enough, almost as if it’s not worthy of housing your beautiful plants. But that’s something you can easily deal with. You just have to find a way to decorate the pots so they look exactly how you want them to. Having trouble coming up with a design? Check out these cute suggestions.
One option is to use fabric. Basically you’ll have to apply some adhesive to the area of the flower pot you want to cover up and then place the fabric on top. You can paint the pots before this part if you want them to have a certain specific color or simply to change their look.
Another idea is to use acrylic paint and gold leaf to give your flower pots a chic makeover. Use tape to mark the pattern or design you want to create or if you simply want the whole pot to have the same color you can skip this step. Paint the exterior of the pot and a little bit of the interior. Remove the tape and apply glue to the empty spots. Then put gold leaf on top. Find out more about the project on 333bracket.
View in gallery
You can improvise in a lot of nice ways when decorating a flower pot. For example, use things you already have such as a decorative napkin or a piece of fabric that you like. Paint the pot, let it dry, cut out a design from the napkin and adhere it to the pot with mod podge. Seal the whole design with another coat of mod podge.
View in gallery
Check out littleredwindow to find out to make stenciled flower pots. The project requires the following supplies: terra cotta pots, outdoor craft paint, contact paper or vinyl and a craft knife. Apply two coats of paint on each pot. Cut the stencil you want to use and use contact paper for this part. Apply it to the pot and get the air bubbles out. Apply a few coats of white paint and tehn remove the stencil to reveal the design.
A really interesting option is to decorate your flower pots with newspaper. The project is really simple. Take some terra cotta pots, some mod podge, a newspaper, some acrylic paint and twine. Apply mod podge on the exterior of the pot and adhere newspaper pieces to it. Once it’s all covered up seal it with more mod podge. Don’t forget to paint the rim using a color of your choice.
The idea offered on bywilma is really chic and worth a try. To make your planters look like this you need white paint, gold leaf and glue. Basically you make confetti out of gold leaf and you glue the small pieces to the bottom part of the planter in a random pattern.
View in gallery
Similarly, you can decorate your planters with glitter just to make them stand out a bit. Start by painting the planters if they don’t already have the color of your choice. Then use mod podge and glitter to cover the bottom portion of the planter. Use tape to get a nice clean line across.
View in gallery
If you want to try a more more approach, check out the idea featured on madiganmade. You’ll need brown wrapping paper and some sort of twine or rope. Wrap the pot in paper and trim the edges. Use a glue gun to attach the rope around the top half of the planter. That’s pretty much all you have to do.
Using burlap and ribbon you can make your flower pots look cute and elegant. Basically you just have to cut a piece of burlap and wrap it around the pot, leaving the top and the bottom exposed. Tie some ribbon around to keep the burlap in place.
If you want to personalize your flower pots, how about giving them chalkboard labels? Or you can just paint their exterior with chalkboard paint and then customize them however you want as many times as you want. Such a pot would also make a nice gift for someone.
Author by Amanda Formaro on April 4, 2014 Updated on March 27, 2019
I was at the Dollar General one day and saw that they had a big display of flower and vegetable seeds. I grabbed several, but then the “must recycle everything” portion of my brain kicked in and said “hey, what are you going to do with the empty packets? Hmm?” I like to decoupage clay pots, they turn out so fun, so that’s what I decided to do.
A little color coordinating with paint and the seed packets had to be done first. I started digging through my collection of Patio Paint which I LOVE. I adore how it goes on and stays there, just has such a nice feeling to it! Patio Paint is made for porous surface like clay pots and works beautifully.
I picked Sprout Green , Fuchsia and Pumpkin . I also used Americana Decou-page , but Mod Podge is great too. In fact, you might want to opt for the outdoor formula if you plan to use these outside.
This winter has been long, long, long. As you can probably tell from the pictures, I made this project last year when it was still warm and I had lovely plants in the ground and in pots!
If you keep up with me on Instagram, you probably saw plenty of flower and herb pictures last summer. Here’s a fairly new lavender plant I have. I’m hoping this year it’s much bigger!
And you probably remember this guy. I found him at the local flea market and placed him right by my kale plants…
This is what he looked like this winter!
This is something else I can’t wait for. Green grass…
I cannot wait to get into my garden, plant some herbs, bring out my fairy garden and welcome my toad back! He’s come back two years in a row, so hopefully I’ll see him again this year. Do you remember this Toads Welcome Herb Sign I made?
Anyway, maybe I can bring some spring into my world with a craft project!
This is a pretty simple craft, all you do is paint the pots and let them dry, then cut the seed packets up and decoupage them onto the pots. Easy peasy! Full printable instructions are at the end of this post. I hope you have fun with this or a similar project.
More garden crafts
If you need some inspiration for other garden projects, check out some I’ve chosen for you below. Or you can browse all the garden crafts here.




